
Table of Contents
According to Starizona, mosaic images are created by combining multiple smaller images into a larger one. But why would we want to do this anyway? Here, I want to discuss how to merge photos in Photoshop to create wild and impressive astrophotos.
Recently, I started a rather large project to combine images of the North American nebula and create a panorama of the whole region. Why? Because it’s a beautiful target. Unfortunately, my telescope and camera combination have a focal length too large to frame the whole object in the field of view.

- 12 month subscription
- For Mac or PC
- New Generative AI
- Excellent tool which I use every day
My telescope has a focal length of 650 mm, and combined with my camera (ZWO 533MCPRO), I need to take images of separate panels and then combine images in Photoshop to produce the image. I have previously taken an image of the nebula with a DSLR and a 135mm lens, which resulted in an excellent picture of the entire area of the North American Nebula and Pelican Nebula (see below):

As you can see in this picture, the target has limited detail, and I have seen many photographs with tremendous detail. I wanted to capture those details for myself! The only way I thought to do this was to learn how to merge photos in Photoshop and create a larger image. But I didn’t know exactly how to make such a mosaic picture this large.
I believed that if I could understand how to merge photos in Photoshop, I could create separate images of a target, like pieces of a jigsaw, and then by combining them, I could create an image of the larger target.
I have created mosaic images before. Check out the example below of the Veil Nebula, which was made up of three panels put together. Not too shabby!
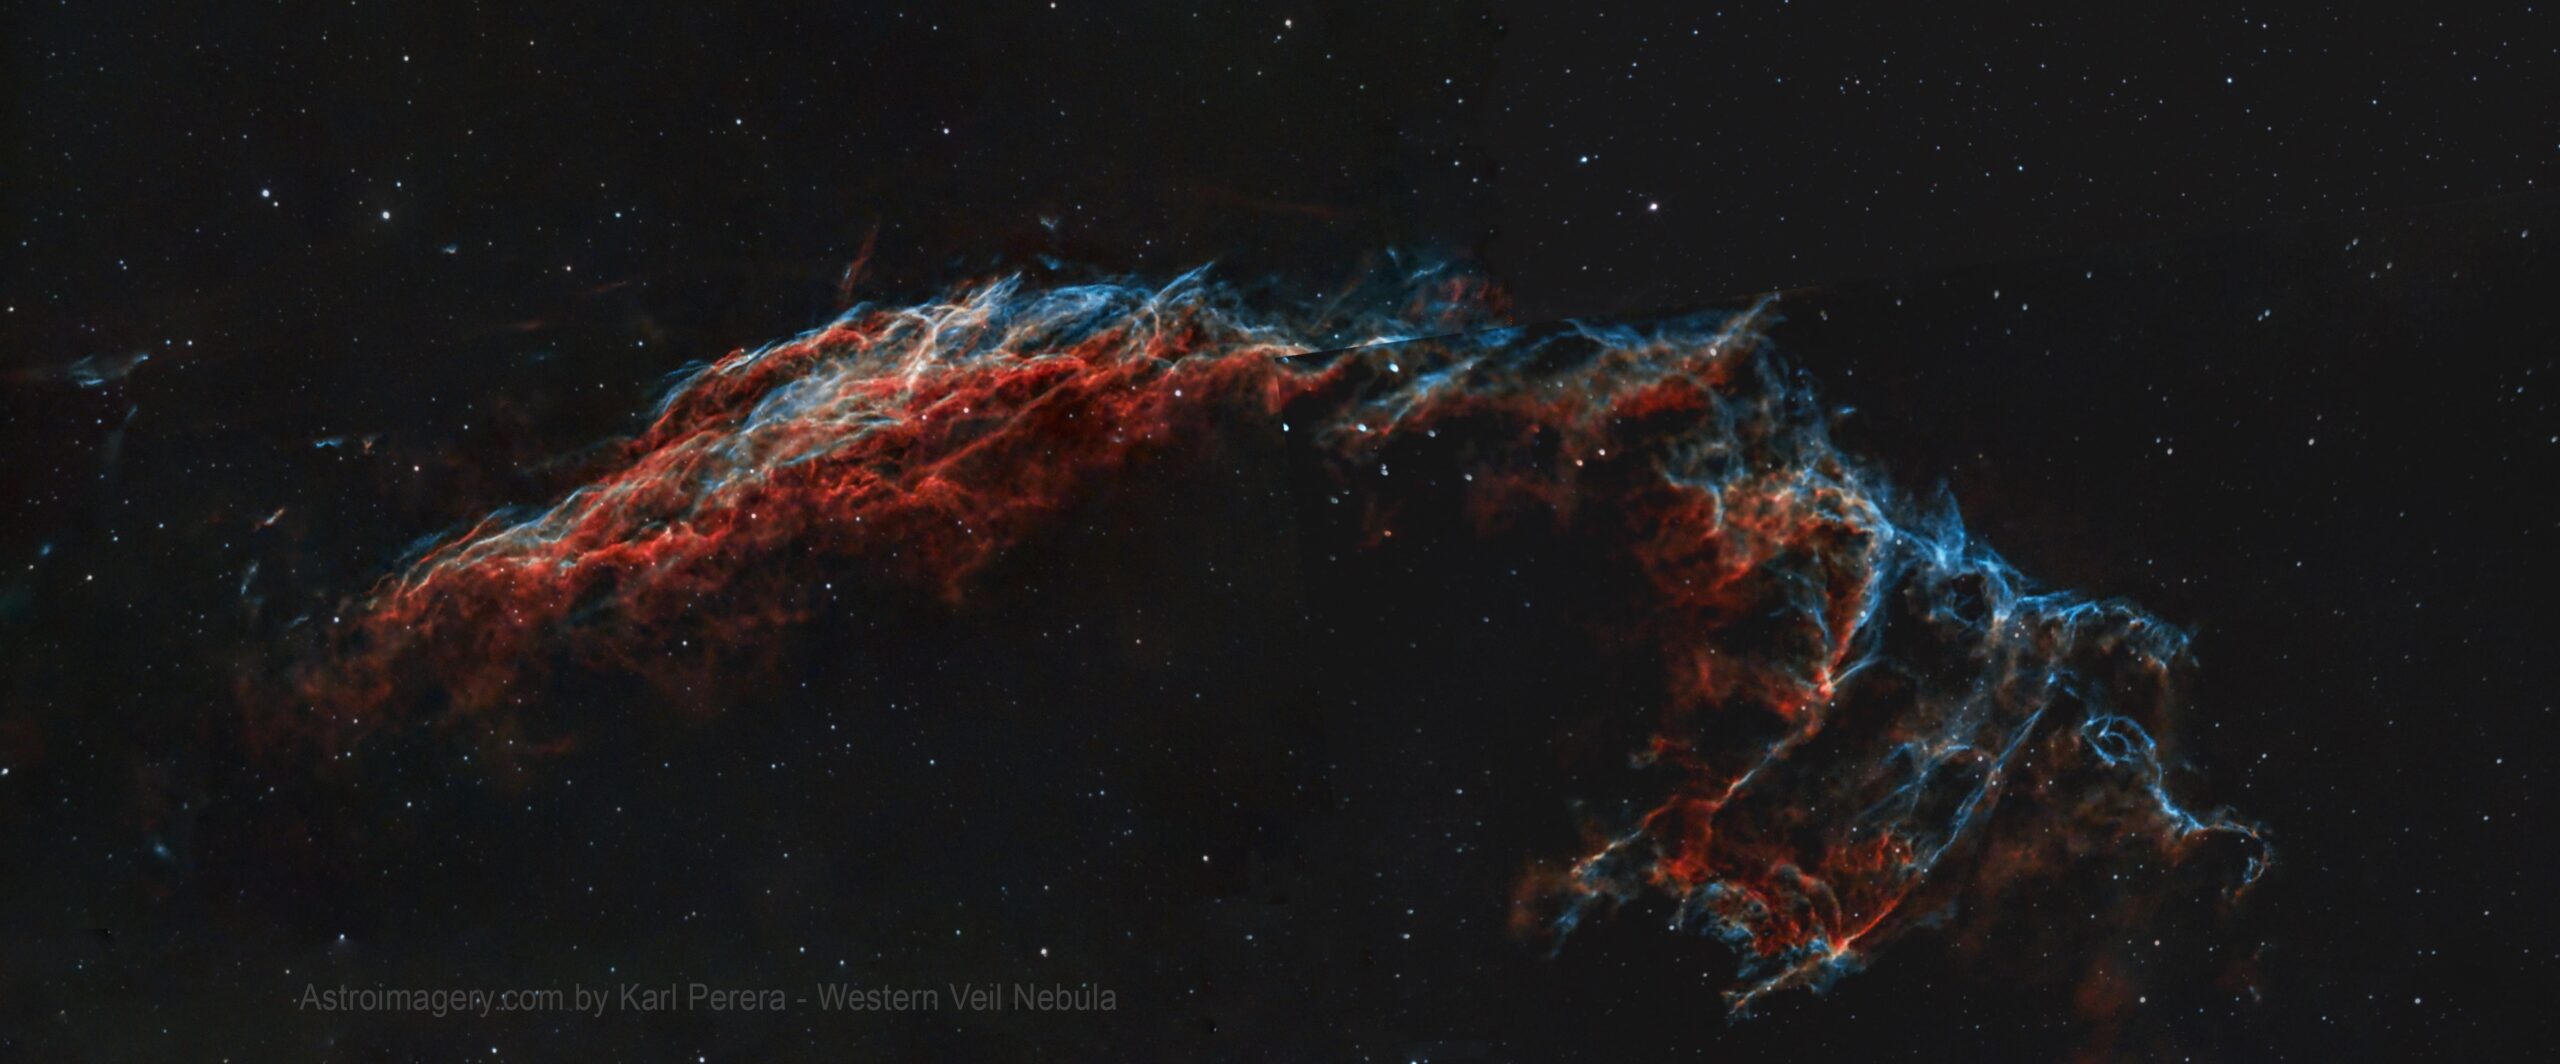
The results astounded me! I managed to make the above picture by merging photos in Photoshop, as this is the program I have been using for astrophotography processing. like one complete image, and I don’t think you can see where the three images join together. This was my first attempt at such a composition with mosaic images.
However, as you’ll soon see, this larger project turned out to be quite difficult and took a lot of time. We’ll come back to this in a short while.
Suffice it to say that merging photos in Photoshop is not that easy and requires some practice to get right. Obviously, the more separate images you need to combine, the more difficult it becomes to create the final image.
Design is not about what you see, it’s about what you make others see.
– Visme
What are the benefits of creating a mosaic image?
Learning how to combine images in Photoshop to create a mosaic image offers numerous benefits. Not only does it allow you to capture and process images on a grander scale than a single frame would permit, but it also offers a unique set of challenges and rewards that can make the process even more gratifying. As someone who’s been down this path, I can vouch for the following advantages:
- You can capture larger targets with the same equipment (telescope or lens) that you normally use for astrophotography.
- When you break a larger target into smaller sections and merge multiple photos in Photoshop, you can capture more detail in the object compared to an image taken of the entire target in one frame.
- You don’t have to buy different telescopes or lenses with different focal lengths. This will save a lot of money.
- You have the option of composing different images. You can create images of individual panels or a combination of them.
There are also some disadvantages to creating mosaic images. These include the extra time that is needed to image each panel. For example, if you take 5 hours of total exposure time for a small target that fits into your field of view, imaging a large target with four panels will take 20 hours, 5 hours for each section.
You’ll also need to spend extra time processing mosaic images because you’ll have more panels to process, and then you’ll have to position them correctly, combine them into one image, and make sure that the images match well enough that they fit together seamlessly.
The extra time you spend should, however, be well worth it in the end. Let’s find out how to merge photos in Photoshop.

- Paperback version
- Step-by-step guide
- Bargain price
- Rating of 4.3 on Amazon Reviews
Gathering the Materials: How to Merge Photos in Photoshop
Creating a mosaic image manually in Photoshop requires careful planning and attention to detail.
This is what you need:
- Images you have stacked in a program such as Siril or Deep Sky Stacker.
- calibrate the colours and perform background extraction or gradient removal.
- A software program to edit the images. I use Photoshop, but many alternative programs exist for this. Examples are Pixinsight, Gimp, or the AstroPixel Processor.
Let me explain the process I used to create my mosaic images.
My Example: How I Planned My Mosaic Image of the North American Nebula
The North American Nebula, known as NGC 7000, is a huge area of nebulosity resembling the American continent, hence the name. It’s such a well-known target, I just had to capture it.
My earlier attempt (see the picture above taken with a DSLR and 150mm Samyang lens) was nice but didn’t contain as much detail as I wanted to capture, having seen many images posted online.
In this pastime, we are never happy, are we? Always wanting to do more to get better photos and more detail from our equipment! It’s human nature, I guess!
So, I had to learn how to merge photos in Photoshop. Here’s what I tried out.
Planning to Image the Nebula
How do I divide up the nebula and how do I merge photos in Photoshop?
I solved this using a nifty website called Telescopius which enables you to enter your telescope and camera details to produce a simulated view of an astronomical object as viewed from your telescope, exactly as it would appear in your camera’s field of view. Very handy!
Once I found the North American Nebula, I could easily see how little of it could be photographed in one single frame. My telescope has a focal length of 650 mm, and considering that the nebula looked small in the picture taken with my 150mm Samyang lens, I estimate that the ideal focal length to capture NGC 7000 would be about 300mm. Unfortunately, I don’t have a lens or a telescope with a focal length close to that.
This is why I decided to capture as much of the nebula as possible with mosaic images.
The next step was to divide the image into sections. I needed at least six or more of them, so I entered the number of panels and then moved the image around until I was happy. Telescopius then gives you the coordinates of each square section of the image. I entered these separately into my imaging program, Astrophotography Tool. See the image below for how this looks:
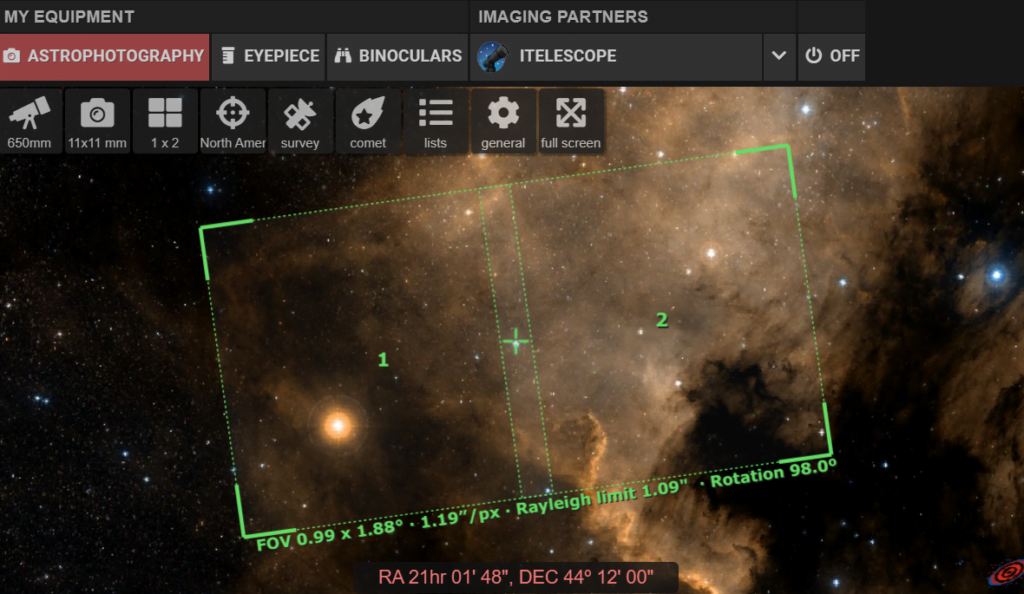
Note that there are only two panels in the image above. On the website, clicking on the panel icon, which shows 1 x 2 in the image above, gives you a list of the coordinates of each of the boxes. These will create your individual panels.
Over the course of two to three weeks, I took photographs of each panel, a different one every one or two nights. I aimed to get five hours of imaging on each panel. I thought it was important to get equal time on each part to get a good representation of the details of the nebula.
One important thing to mention is that you do need some overlap between the different panels for two reasons. Firstly, to make sure you don’t miss anything in between the panels, and secondly, to line up the images correctly by overlaying and aligning the panels to create a perfect image. Telescopius allows you to adjust this overlap.
That was the plan, anyway. The reality of six panels was much harder than I had thought!
Preparing the Images
Before I continue with what I did next with my images, here is an important note:
First and foremost, to create a mosaic image, you need to gather your images. For an astrophotography mosaic, you would need pictures of stars, galaxies, and other celestial bodies. Make sure your images are high-quality, as pixelated or blurry images won’t give you the desired result. Remember, the better the quality of your images, the more detailed and beautiful your mosaic will be.
OK, let’s continue.
My Workflow in Photoshop
Next, I began processing my stacked images to prepare them separately.
I opened each of my stacked images in TIFF format and began processing them. This is the way I did it:
I stretched the images, removed any gradient, adjusted colour saturation, and generally played around with the image until I was satisfied with the result. I did this for each panel. As best as I could, I tried to keep the process the same for each panel.
I then created a large canvas in Photoshop and began copying and pasting the different panels onto the canvas. I used the transform tool to move the panels around the canvas.
I then tried to piece the panels together like a jigsaw puzzle to create my overall image. This was harder than I thought, as my images did need rotating and moving a bit. It was also difficult to see immediately when the panels were correctly aligned. I did this by zooming in and looking very carefully at the places where the images overlapped.
It can be a time-consuming task to try to figure out how to merge multiple photos in Photoshop. But trust me, the end result is worth every second. In fact, I spent at least a full day doing this and redid a few steps until I was happy.
Why was this step so difficult? There could be a few reasons for this. Maybe I made some mistakes with the coordinates when imaging? Or perhaps the fact that I took photos over a couple of weeks may have caused the images to rotate in the sky and not line up correctly.
I also found that I had to flip the images horizontally and, in one case, even vertically. I also realised that the different orientations of the camera and nebula before and after the meridian flip might have caused some of these problems. Confusing!
The main thing I learned about how to merge photos in Photoshop is to be very accurate in the planning stage. I probably proceeded too quickly. Next time, I will calculate the coordinates for each panel before starting. I added each panel to my imaging program one or two at a time. I won’t do that again!
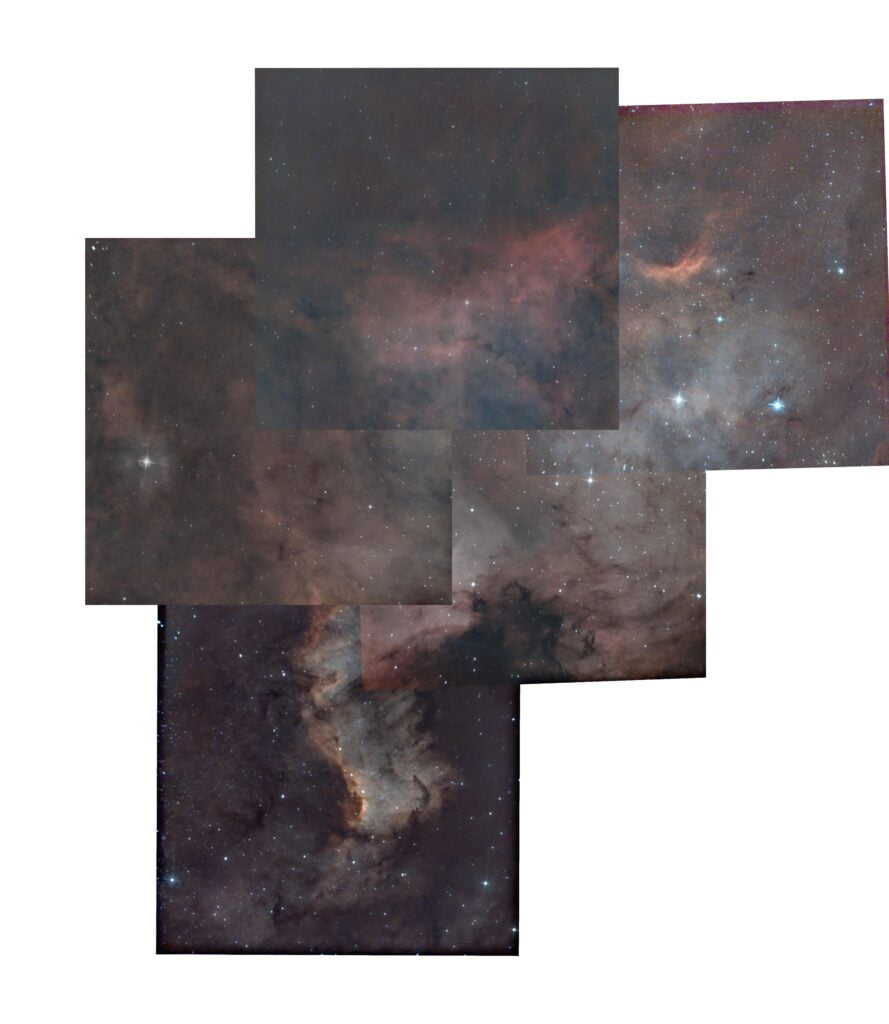
In the image below, you can see the image I constructed, and it does show how untidy this puzzle process can be. This could have been improved with better planning, I’m sure. Next time, hey!
Further Challenges
One problem I faced was working out whether I should process each panel separately (as in the picture above) or combine them to create one large image and then process it. I decided on the second option when I saw the untidy image above with panels mismatched in colour, brightness, contrast, etc.
I assumed the second option might create a better image with less obvious seams where the panels join. If I kept each piece as a separate layer, perhaps I could blend them together and adjust other aspects of the image to match them.
Previously, I had tried to piece together the stacked images one by one and keep them as close to the original, unprocessed image as possible. This made it much more difficult to align the images, as it was more difficult to see where the images should be joined. I also suspected that if I flattened the layers into one large image and tried to process it, any differences between the panels would be magnified as the image got stretched. This is one major reason why I chose the second option (keeping layers separate, processing each layer one by one, and then finally trying to match them).
Why were the panels’ colours, brightness, etc. different? I’m sure that it is because the conditions under which each panel was imaged were slightly different. Lighting, time of night, position in the sky, position of the telescope, and seeing conditions could cause the colour and light to be imaged differently in each panel. It’s also possible that light pollution coming from the lights around my garden or from outside could vary from one night to the next.
The camera might also be the cause of another issue. There is always some distortion, although I find this very minimal. However, the differences in perspective and position of the camera for each panel may have caused distortion, which may show when the images are blended together.
Such distortions are usually worse at the edges of a photograph, where the lens does tend to elongate the stars. Many use a field flattener to minimise this, but I have not used one.
I’ll try both options, I thought. So, I constructed an image from differently processed panels and another with very lightly processed images (just enough to line them up). Which works better? We will see in the final image.
Completing the Mosaic
After aligning all the images, the final step is to blend them together. Photoshop has different tools that can help with this, such as the Blend Mode and Opacity adjustments. Experiment with these tools to get the desired effect. I personally prefer the ‘Soft Light’ blend mode, as it gives a smooth and natural blending effect.
After several hours of editing, I realised I needed to find a solution for blending and removing the ugly and very obvious seams between images. After some research, I found two solutions, and I had to use both:
These two methods solved the problem of noticeable seams between images:
- Photomerge – an automated technique in Photoshop that aligns images to form a mosaic and then smooths out the seam so it becomes invisible.
- Manually removing the seam with a brush effect. This was a very simple fix that also worked well.
If you want to learn how to use these two methods, then watch these videos I found on YouTube below:
- Creating Astrophotography Mosaics Using Photoshop Photomerge – YouTube
- Photoshop – Remove Line Between Two Photos – 60 Seconds – YouTube
I found that the auto-photo merge explained in the second video above worked well but left one panel untouched. I had to use the manual method for the remaining panel, which, for some reason, the photo merge in Photoshop couldn’t align and blend. Anyway, the end result was much better and quicker than anything I could do myself, as you can see if you compare my previous images with this one below.
I’ve since also tried to use this method to create another mosaic from three panels of the Pleiades Star Cluster, but I also found that the program was not able to align the images, although it did blend them. This is considerably better than trying to manually blend them. I have also found that doing basic processing in Siril rather than going to separately process everything in Photoshop and then merging them is the best way to go.
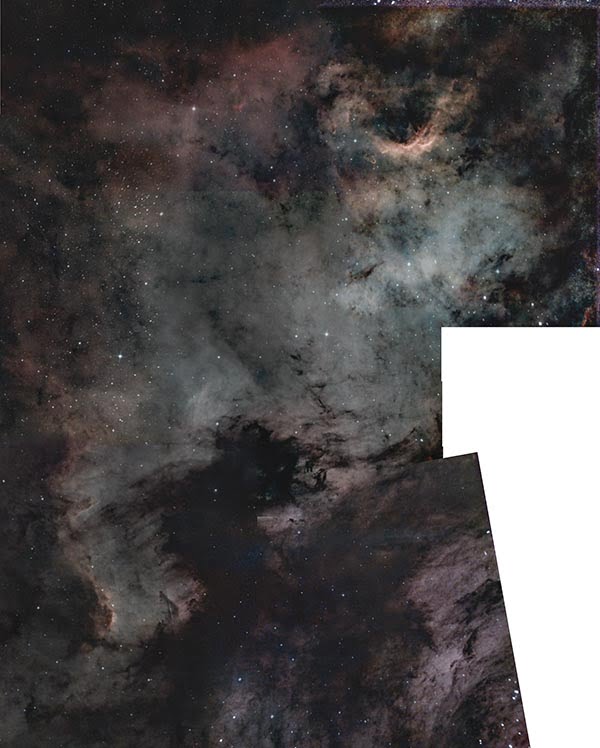
Here is the image I had after carrying out the steps explained so far. It’s not quite finished. I just need another small piece, and then I’ll crop the final image.
Last night (that is, September 2023), I finally managed to add more imaging to this project. I spent a number of hours each on two more panels; I think that makes nine panels in total. Let’s hope the project is now complete, and then it is a matter of finishing off the processing and merging to create the final image of the North American Nebula region.
Here is the image after adding the final two panels and cropping:
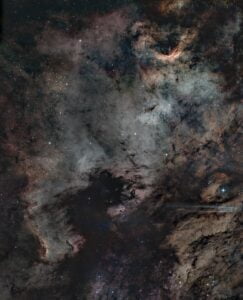
At this size and at this low resolution, it looks fabulous, don’t you think?
Can you see the streaks of light that are on the lower right-hand side of my image? I am planning to try to get rid of those and improve how the image looks. Another problem when the higher-resolution (TIF) file is examined and zoomed in is that some of the panels have slightly different colour saturation, which will almost certainly show on a large-resolution print.
So, there is still some work to do and more research to be done into Photoshop editing techniques. But I am getting there, and this is my first attempt.
Creating a mosaic image in Photoshop is challenging, but don’t let that discourage you. With patience, planning, and creativity, you can create stunning astrophotography mosaic images to be proud of. And remember, practise makes perfect. The more you try, the better you’ll get. So, keep experimenting, and happy mosaicking!
Conclusion: Displaying and Sharing Your Beautiful Mosaic Images with the World
I still need to do more experimenting before I can use an automated and reliable workflow that results in a mosaic of high quality with matched saturation and brightness in each part of the image. As most things in astrophotgraphy it seems to be an ongoing learning process. I will get there, and when I do, I’ll explain how I did it so that you produce similar results yourself.
The final result of a mosaic image can be a high-resolution image that captures the fine details and textures of the original subject. But once you have your mosaic picture, what should you do with it, and where should you share it?
I share it with others who are interested first. I share my images with family and friends on WhatsApp and on my Instagram page.
I also offer my best images as NFTs, wall art, and high-quality prints on this website. You’ll be able to get these from my website store very soon. If you are interested, contact me to learn more about my space art and how to get my astrophotography prints.
I hope this page has answered your questions and that you’ve found it helpful.


