
One of the first things you will need to learn and master before you are able to process astrophotography images is how to stretch an image in Photoshop. I remember how difficult I first found it was to get this right. So let’s take a look at this question and learn the basics of how this should be done.
Learning how to stretch an image in Photoshop is a crucial step in processing astrophotography images. Using the Curves Adjustment Tool, we can increase the contrast and make a RAW image from a camera more visible. The Levels Adjustment will allow the black point to be set after stretching.
It actually doesn’t matter what software you use to edit your photographs and images, you may need to stretch them and nearly all programs allow you to do this. It is especially important when processing images that were taken at night or in dark conditions.

- 12-month discount subscription
- For Mac or PC
- New Generative AI
- Excellent tool which I use every day
Why do you need to stretch an astrophotography image?
The answer to this question is quite simple. The image below shows an unstretched image of the Dumbbell Nebula I created in July 2023.
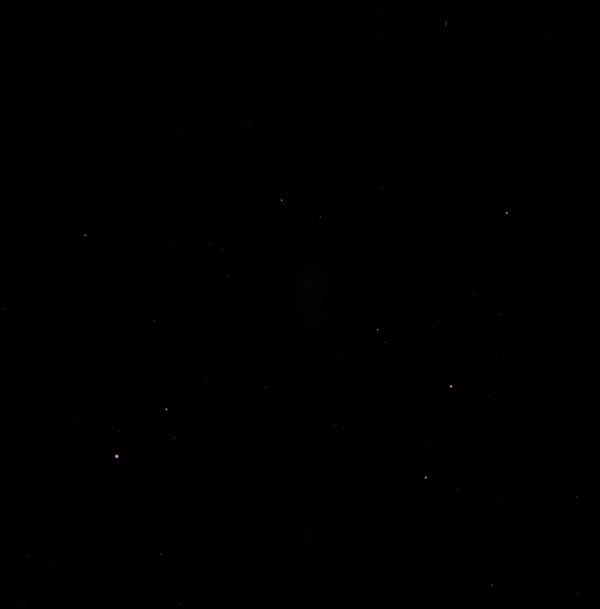
When you take a photo of the sky, the camera will capture a lot of data about the stars and galaxies. This can be seen as a form of data that we call an “image”. However, when you want to view this image on your computer or phone, it will be very dark and not as clear as what you would see if you were looking at it with your naked eye. You can see hardly any details in the unstretched stacked image above which I created from 46 x 6-minute exposures of the Dumbbell Nebula (M27) in July 2023.
So how do we fix this? We need to stretch the image so that it becomes lighter and more detailed. This is done by using an astrophotography image stretching tool such as Photoshop or GIMP.
Now let’s take a look at how the stacked image of M27 looks after stretching and processing:
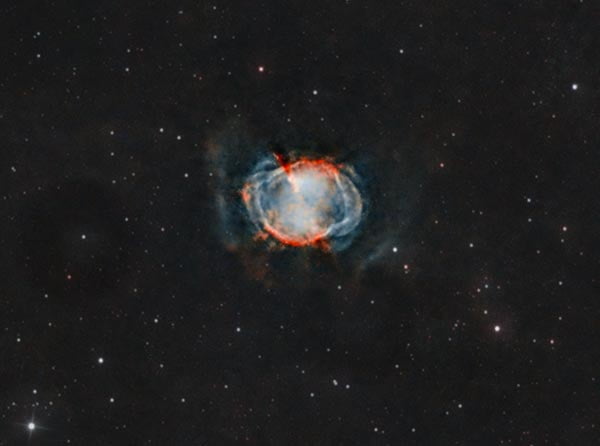
You can see a huge difference stretching the image has made and has brought out all the details and colour hidden in the original image! This is why we stretch the curve of the image in Photoshop or other editing software.
Stretching astrophotography images is a process that is used to increase the contrast of an image. This can be done by adjusting the brightness and darkness levels of the image. It can also be done by changing the color balance or saturation levels.
The primary reason for stretching astrophotography images is to make them more visible. This process works best when there are dark areas in the image that are not well-lit or have a lot of noise. Stretching increases the brightness of pixels and helps the highlights to stand out from the background.
When we take a picture of stars, they appear as points of light in the sky. The brightness of these points varies depending on how bright they are. Stars that are brighter will have higher intensity values than dimmer stars. This means that there will be more pixels with high-intensity values than low-intensity values in the image, making it look like a bright starfield instead of individual points of light.
To solve this problem, we need to stretch the image so that all the pixels have about the same brightness value.
Many astrophotographers will stretch their astrophotographs to make the stars appear as if they are pinpoints of light. This is done to reduce the effect of atmospheric distortion on the image and increase contrast.
All About Image Stretching in Astrophotography
What is image stretching? Image stretching is a technique that allows for the adjustment of an image’s contrast and brightness. This technique can be used to correct images that are too dark or too bright or to create a more aesthetically pleasing image.
When I first looked at the photos coming out of my camera I was shocked that I could hardly see anything but this is quite normal unless you take very long exposures or use a higher ISO setting.
Image stretching can be done in a variety of programs, such as Photoshop and GIMP. I use Adobe Photoshop CC to stretch an image using the curves adjustment tool. Here are examples of how Photoshop can improve the visibility of images.
How to Stretch an Image in Photoshop
The Curves Adjustment Tool is a powerful tool in Photoshop. It allows you to control the tonal range of an image by adjusting the brightness and contrast. You need to be careful when doing this. It’s important to learn how to stretch an image in Photoshop without distortion.
The Curves Adjustment Tool is located on the right side of the screen, just below the histogram. To access it, you have to click on it. Once clicked, you can manually adjust points on the curve. Make sure not to stretch too much and avoid clipping the curve at the top end.
The Curves Adjustment Tool in Photoshop can also be accessed by pressing Ctrl+M. The Curves adjustment tool can also be used for color correction and selective color adjustments. The Curves adjustment tool has four options: RGB, Red, Blue, and Green. Check out some of my astrophotography images using curve adjustment.
Different Techniques for Image Stretching of Photos in Photoshop
A technique for darkening a photo without affecting the colors is to use the curves tool. This technique is not perfect and can cause some color distortion, but it can be used to fix some photos that are too dark.
The levels tool in Photoshop is another technique for darkening photos. It does not affect the colors of the photo but it could cause noise or other unwanted effects if used incorrectly.
The brightness/contrast tool in Photoshop has a slider that can be used to adjust how bright or dark a photo appears on the screen. This tool generally does not distort the colors of the photo, but it may still cause unwanted effects like noise or color shifts if not adjusted carefully.
The last technique for darkening photos in Photoshop is by using an adjustment layer with an opacity of 50%. This technique
One of the most common problems that photographers face is the inability to capture images in low light. This can be solved by using a camera with a higher ISO or by using a tripod to avoid camera shake. However, there are times when these techniques won’t work and you will need to use Photoshop to stretch your dark photos. Also, increasing ISO may increase the noise in your photos. For example, I tested my camera, the Canon 600D, and found that the best setting for ISO was 800 in terms of the noise created, and then the second-best setting was 1600 ISO which had very slightly more noise.
How to stretch an image in Photoshop? There are many different techniques that can be used depending on what type of photo you are trying to stretch. The first technique is called Posterize and it stretches the photo while maintaining the colors in the image which makes it perfect for black-and-white photos or when you want to create an artistic effect. Another technique that can be used is called Levels and this technique stretches your photo while also adjusting the brightness and contrast levels so that it.
Improve stretched image quality in Photoshop
The quality of a stretched image in Photoshop is important because if you don’t take care or if you overstretch it your final image will not be the highest quality.
A couple of things you should avoid when stretching images for astrophotography include:
- Do not clip your blacks.
- Do not stretch so much that you increase the noise in your image.
- Stretch your image just enough to maximize the detail in your image.
- Avoid stretching so much that you highlight the unwanted background details and imperfections that exist in your image data.
Conclusion
I hope that I’ve been able to help you by explaining how to stretch an image in Photoshop. You can use many different programs to do this. The technique is the same. Whether you are a beginner in astrophotography or more experienced but need some guidance in the editing and processing side of astro I hope you’ve found the information you wanted here. If not, don’t hesitate to contact me with any questions you have. I’ll be happy to help!
Enjoy your time under the stars! And do stop by again, I’ll be adding to the site regularly.


