
Astrophotography stacking is a process I do all the time, and one thing I’m finding is that my images require many hours of imaging. Recently, I took photos of the Iris Nebula, and so far, I’ve taken about 5 hours’ worth of 30 second images. Ideally, for an amazing picture of this stunning nebula, I would need about 10 hours or more.
When I photographed a nebula recently I used my alt-az mount and Celestron 130slt telescope. I took 5 hours of 30-second shots is a total of 600 separate photos! The last time I stacked about 700 or so images that I had taken it took well over an hour to stack them in Sequator (the software I usually use for my astrophotography stacking). I’m wondering if there might be a quicker way to do this by using fewer resources on the computer to achieve the same quality in the final image.
So I’ve decided to run a couple of experiments, the first of which will be testing different astrophotography stacking processes to achieve the final image. By comparing the final result, I may be able to figure out if there is a quicker way.
Before we move on to my experiment, let’s quickly run over the basic astrophotography stacking techniques that are normally used.
How to stack astrophotographic images
Here is a brief run-through of what you need to do when stacking your images:
- Check your images for quality. They should be in focus and without any trailing stars.
- Take calibration frames. You can use flats, darks, and bias frames.
- Put the images in your chosen stacking software.
- Add any calibration frames
- Stack the images
- Process and edit the final image.
My choice of stacking software is SIRIL. I have tested this stacking programme against others and found that it gives great-quality images and even allows me to do some quick editing and processing of the final image before processing it in Photoshop.
Quite simply, I love SIRIL and advise you to try it. It’s free, too!
What are the benefits of image stacking in astrophotography?
The benefits of stacking your astrophotography images are many, and I would say this is a no-brainer.
If you take one photograph of your astronomy target, especially if it is a faint deep-sky object such as a galaxy or a nebula, you’ll see a fuzzy image without many details.
The more you add images to your stack, the better the final image will be. Details will start to emerge, and noise will drop.
As you increase the number of images in your stack, the noise will drop in proportion to the square root of the number of images. In other words,
If you take 4 images, the noise will drop by half.
Here’s a quick table to show how astrophotography stacking improves noise:
| Number of images stacked | Noise level compared to single image |
| 4 | 1/2 (50%) |
| 9 | 1/3 (33%) |
| 16 | 1/4 (25%) |
| 25 | 1/5 (20%) |
| 36 | 1/6 (16.7%) |
| 49 | 1/7 (14%) |
| 64 | 1/8 (12.5%) |
| 81 | 1/9 (11.1%) |
| 100 | 1/10 (10%) |
Another way to think about the stacking technique’s effect on the noise of your astrophotography image is to think in terms of how many times the noise will be reduced compared to a single image.
So just taking a few examples, four images stacked will reduce the noise two times, and nine images will reduce it three times. 16 images give you four times better noise, and so on.
If you keep going, you get ten times less noise with 100 images, but as you can see in the table above, there are diminishing returns, and eventually there is no point in taking any more images to reduce the noise. That can be better done in your post-processing.
The benefits in terms of the details which you can see after stacking your images is also incredibly impressive. Image stacking is therefore a must in astrophotgraphy.
Experiment in Astrophotography Stacking: Group Stack
For my target, the Needle Galaxy, I’m going to choose 40 images and I’m going to divide them into 2 groups of 20 each. I’m going to stack these 2 groups separately so that I have two stacked images.
Then, I’m going to combine the two stacked images by again stacking them in Sequator. Learn more about Sequator and other software I use for astrophotography stacking.
For the second image, I am going to do the standard astrophotography stacking method where I will stack ALL 40 images in one go.
Finally, we’ll compare the differences between these two processes.
After we have a look at the results it may be necessary to run further experiments to answer this question:
Can I divide a large number of images into separate stacks and then combine them together to produce the same or better quality then stack all the images together in one go which may take a long time?
This should show whether it is possible to separately stack smaller groups of images and combine them later rather than all images in one go. The reason I think this could save time is that if I image a deep sky object over several nights I could stack it after each session and then combine them later rather than waiting until I have finished all my photography on one target and then stack the images altogether. It doesn’t really save time but seems more convenient and would allow me to check my progress as I went along. But, what will the result be?
Comparing two groups stacked separately then combined vs one stack of all images
Side by side overall view


As can be seen the image on the right is much noisier! The images have not been post-processed in photoshop as this is a direct comparison.
It would appear from this test that we shouldn’t combine images into groups and then combine them. This idea occurred to me because sometimes I might take 1000 images and one stack will take a long time to complete but if I broke it down to stack each night’s images separately I could then stack them together at the end, saving time. It appears from the first test, that this is not going to be such a good idea!
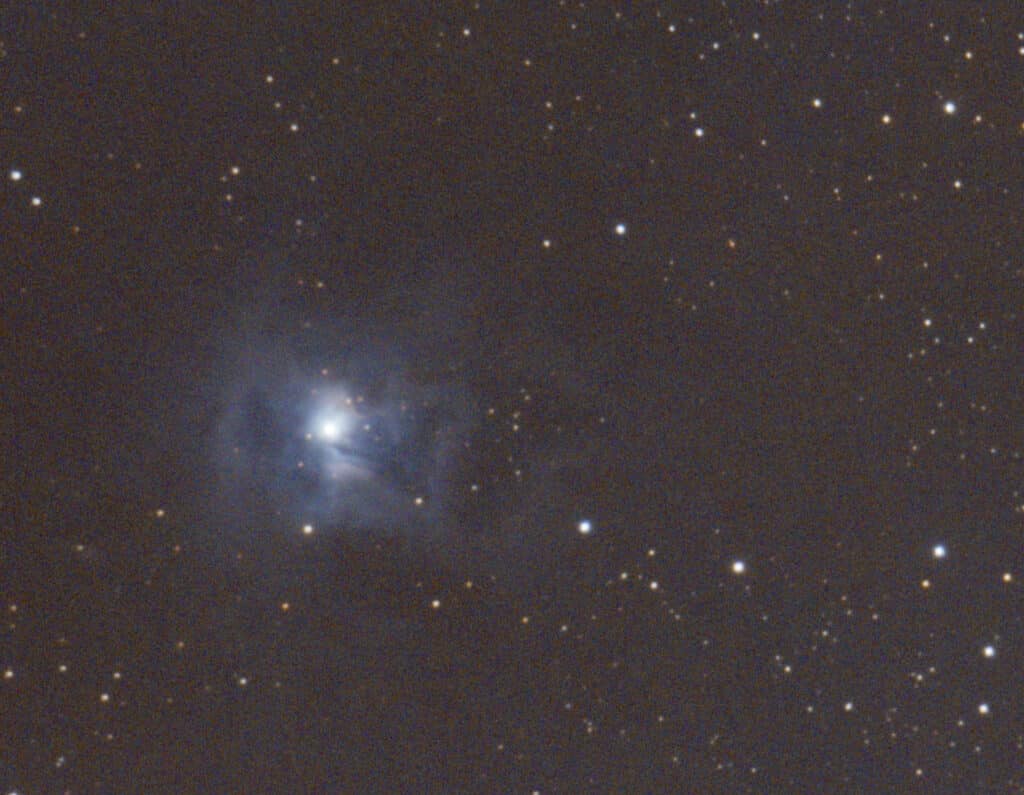
Test Two: astrophotography stacking with many more images
Let’s this time experiment by using the same process as above and stacking 700 images of a different target, (the Iris Nebula), in two different ways. Process A will stack two groups, one of 482 images, and the second of 218 images, and then combine the two stacked images together. Process B will be a stack of all 700 images done in one go.
Will we verify the result we just got above?

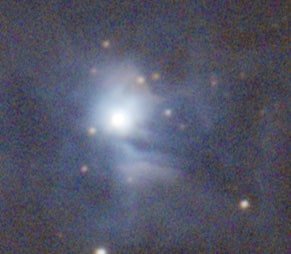
I think the difference in image quality can be seen. The second image seems less noisy although not such a big difference this time. Let’s look at a close up of each image and see how the details compare when inspecting more carefully:

What do you think this result shows? Does it confirm the first experiment? Should we do partial stacks and then combine them to save time or should we do a complete stack of all the images to get the best result?
I think the first experiment and the second both show that the latter is the best course of action. We can’t save time if we want the best image. We need to stack ALL images each time we compose a stacked image of a target to do it justice.
I think the noise improvement is still obvious and the detail is improved in the nebula stacked in B (all images stacked together). The color contrast is also better and the stars also have better color. But it is close!
I think this settles the argument for me and I won’t be doing any partial stacks again. This agrees exactly with what was claimed in several posts I read online and especially on the Cloudy Nights Forum.
It always is best to test these things for yourself though or you are at the mercy of what others say. I hope my tests have helped you figure out what to do and perhaps you might even run a quick test of your own to verify my results with your equipment.
Check out some of my other astrophotography images.
I should mention that these images were taken with the following equipment:
- Celestron 130slt reflector telescope with AZ-Alt mount
- DSLR Canon 600D astro-modified
- No filter was used
- Bortle 5 sky
- Generally good seeing conditions with some high clouds at times
- Exposures were 30 seconds at ISO 800
One particular feature of the Iris Nebula is that it has a dark nebula and dust which needs time to become clear in the images. The single larger stack does seem to bring out the darker dust and nebula more and I have no doubt that with more time on this target it will improve still further.
I plan to do at least another five hours on this target and will post the final image when it is done. Stay tuned for that!
If you have any questions for me or want to tell me what you think about this test. Or…if you have any interesting tests you have done similar to this please drop a comment below and let’s get a discussion going here.
You can check out this image of Markarian’s Chain, a number of different galaxies in one shot, that uses the power of astrophotography stacking to create an image that is not visible in the eyepiece of a small telescope.
Until next time, thanks for taking the time to drop by and learn about astrophotography stacking with me Karl Perera! See you again soon.
Enjoy the journey and the stars above!


