
Table of Contents
Do you want to learn how to improve your astrophotography images in the shortest possible time?
Through easy-to-follow steps, astrophotography processing can be used to reveal stunning details that were not visible before.
I have three important steps that should be front and centre in your astrophotography processing workflow. I’ll show you what a huge impact they will have and some ways that you can easily put them into practise today.
These three steps will improve the colour, detail, clarity, and general appearance of your images.
If you are frustrated with the look of your images or know they can be much better, then I’m sure you are not including all of these three steps. Each one will improve your results enormously if you focus on doing them correctly and in the right order.
The first technique is something you must already do, but what process have you been using, I wonder?
Colour Calibration
The colour coming out of the camera you use is not calibrated, and therefore your object will appear very strange. All cameras have different sensors, so colours vary greatly. Filters used also affect the colour in your stacked image. This is why my first step in processing any astrophotography image is colour calibration.
When I see a stacked image from my camera, a ZWO ASI533 MC PRO, which is a one-shot colour camera, I usually see a bright green background because of the camera’s green bias in its sensor. The whole image is distorted.
The aim of colour calibration is to standardise the colour of the deep sky object you are imaging so that it matches generally accepted colours for that object. I’d certainly like to start by removing the green background. I don’t know about you, but I don’t see much grass in space!
There are two main ways to do colour calibration, and these are:
- manual colour calibration
- photometric colour calibration
In most image astrophotography processing software that is used for astrophotography, such as Pixinsight, Siril, etc. we can do both very easily. My chosen software lately is Siril, which is excellent and quick to stack and has many image-processing features that I use before moving to Photoshop and my major edits.

- 12-month discount subscription
- For Mac or PC
- New Generative AI
- Excellent tool which I use every day
I normally choose the photometric calibration because it is already set to modify colours to a palette that matches a particular object in the night sky. I just do a search for the object in Siril, and it finds the object. Then I simply apply the colour calibration.
Manual calibration requires first setting a box clear of any stars in the background and setting that black point, then choosing an area of detail that is quite bright and clicking apply. What exactly the software does, I couldn’t tell you, but I suppose it analyses the image colours and then resets them to more suitable values. Instantly, the reds pop out, and the background darkens if done correctly.
It’s that simple in Siril, and other programs have scripts that you can run to do this, so do play around with these.
Noise reduction
Noise in photography is a big consideration, especially in our field of night photography, where the signal is so low because the objects we are photographing are so dim and far away. Many galaxies are millions of light years away from us. No, we are not going to get a strong signal!
We should rather talk about the relationship between the level of signal we want to capture from our object and the level of noise that any camera produces and that is present in each image. This relationship is called the signal-to-noise ratio.
A higher signal-to-noise ratio will improve the quality of the image, and the opposite is true. Anything we can do to boost the signal or decrease the noise will help. It is difficult to boost the signal unless we use better and bigger telescopes or better lenses and optics.
Reducing noise in images is possible in several ways; here are a few of the most important:
- using a high-quality camera that produces less noise (especially a cooled camera).
- stacking many images to reduce noise levels. The square root of the number of stacked images increases the signal-to-noise ratio. Therefore, stacking 100 images improves the signal-to-noise ratio approximately ten times, which is mostly why we stack images in astrophotography.
- We can reduce noise in astrophotography processing software such as Photoshop, Pixinsight, Gimp, and so on. The only problem with this is that decreasing noise usually makes images less sharp, but this is a balance, and some noise reduction in the early stages of astrophotography processing is very helpful.
- Imaging in colder temperatures reduces one kind of noise, i.e., thermal noise. This has caused me all kinds of problems, especially when imaging with a DSLR camera in the summer. Local temperatures climb to 32 °C and above, and the temperature in the camera gets quite a bit warmer than this. One solution is to use camera cooling, and many dedicated astronomy cameras, such as the ZWO 533 MC Pro I now use, have a cooling feature. No matter the time of year, I keep this set to 0°C, and this eliminates a lot of noise I had when using my old DSLR.
If you want great pictures in astrophotography, you must consider noise and try to reduce it as much as you can. If you have too much noise, you will have to image for much longer and stack many more images to try to remove it. I bought a better camera, and the results are stunning! It was almost at the stage where I couldn’t use my DSLR all night in the summer for certain faint objects.
A cooled camera like this one will definitely reduce the noise in your images:

- TEC cooled camera
- 11.7 MP CMOS
- With WIFI
- Minimizes noise
- Great value approx. $730 (price may change)
Star Removal and Reduction
In order to process deep sky photographs I have found that star removal and reduction is a great way to enhance the image of the target without bloating the stars. The reduction part can also create an image that focuses more on the intended target and reveals more details by toning down the background star field.
In some cases, such as when photographing the Veil Nebula, the background stars are very overwhelming and drown the image in a sea of light, which hides the nebula from the eye. Removing some of these stars or reducing their brightness can bring out the details in the nebula or galaxy in your image.
Below, I have tried to show how much difference this can make and how it can improve your astrophotography images by conducting a test. I love to hear what you think.
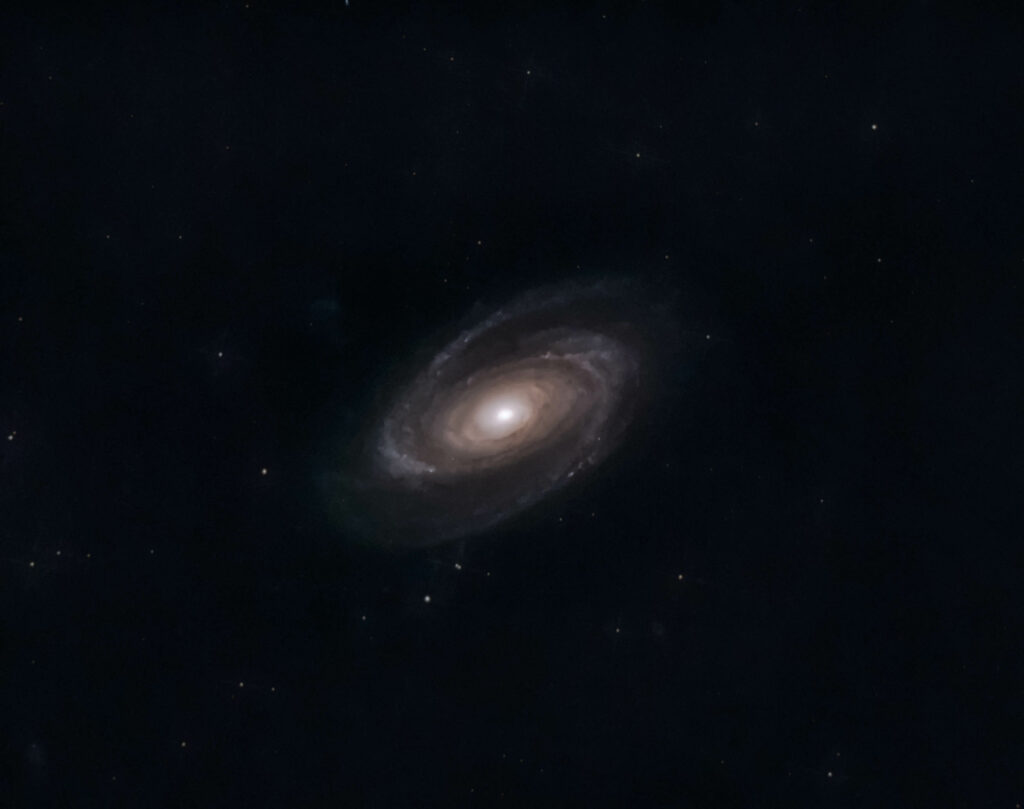
Test Comparing Image Created with Star Removal and Reduction with Image Without This Technique
This is my final image of M81 created without using any star reduction or removal technique except for “make stars smaller” applied to the image when processing in the Astronomy Tools set, which I have in Photoshop.

The imaging details are Optolong L-Pro Max broadband RGB filter.
150 x 120 seconds = 300 minutes, or 5 hours of integration time.
Celestron 130slt reflector OTA. Ioptron CEM 26 EQ mount with auto-guiding scope.
The one downside to this method of astrophotography processing is that while stretching the image we also stretch the stars, and they can become bloated and overpowering. This image does have reasonably unobtrusive stars, though, and is not bad. Let’s take a look at a second image using the same data but processed with star removal and reduction and see how they compare.
Astrophotography Processing Methodology
There are many ways to carry out star reduction, but the method I am using is as follows:
- I begin by loading my stacked image in.tif format, giving it a few small stretches, and adjusting levels. When the stars appear but are not too bright, I copy the layer, adjust the levels so that only the stars show in the image, and then name this layer “stars”.
- I then again copy the background layer and perform star removal using a tool by Russel Croman called StarXterminator. I recommend this tool, and it works much better for me than Starnett++. I then have an image without stars, as in the picture below:

Now that I have a starless and star-only image, I can proceed to stretch and enhance the starless image aggressively in order to bring out the details, and I don’t need to worry about blown-out and distracting stars as I will add those in later to suit my tastes.
I went through a series of stretching and other post-processing techniques until I got an image result I was pleased with and then combined it with the star layer from before. The way I did this was to blend the layers together using the “lighten” setting in Photoshop and adjust the opacity slider as I saw fit to about 60%.
This image shows the final result I got for the same data:
Test Results
Which of the two images you prefer is a matter of your choice and opinion. I personally think they are both good images, and there is a lot to be said about the first image without star reduction. The second image, in my opinion, shows more detail in the galaxy, as I was able to stretch aggressively and apply all enhancements to the galaxy without worrying about the stars.
I think the two images could be more closely matched in terms of brightness, but the differences, despite this, are clear, I think. In this case, there is not a heavy star field such as exists for other targets, so the star reduction was perhaps not so important in the overall final image.
In the future, I think I should give an example from a more intensive star-filled background that will highlight more clearly how effective this astrophotography processing technique can be in improving your astrophotography.
Summary
Three of the most important steps to improve the astrophotography processing of your images are colour calibration, noise reduction, and star removal and reduction. The choice of software and methods you use to approach these three aspects of astrophotography will have a major impact on your results. You can use my suggested methods or experiment and find your own. I know that finding solutions to these photographic challenges will make you a better astrophotographer so I wish you good luck!


