Editing astrophotography is extremely important if you want to transform your raw data into high quality images. Learning how to edit astrophotography will improve your pictures and this skill may be more than half of the work that goes into astrophotography. Why is it so important? Editing will bring out the fine and often hidden faint details in the objects you photograph, it can remove the effects of light pollution and create a unique style in your final image.
So let’s take a closer look at the world of astro image editing and how to make astrophotography pictures look better.
Raw images are dull and need editing to bring them to life. When you look at an image out of your camera on your laptop you’ll notice that it is almost completely black with maybe a few stars peeping out here and there. This is your raw unedited image and this is totally normal. Your image at this stage is in linear form.
To get any kind of pleasing image from this we need to boost the signal in the image by editing it. This is known as post-processing astrophotography images. By following steps such as curve stretching and many others we will create an image that has colour and depth with many of the details you want to see in your image.
I’ll include Basic astrophotography post-processing steps and more advanced techniques for editing on this page and I’ll show you some real examples of an image I am working on as I write this. Please understand that techniques for editing astrophotography range from basic to more advanced. If you’re a beginner than you’ll need to start with the simple steps and with time and experience you can progress to the more complex techniques for editing astro images.
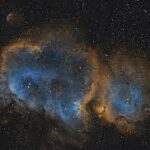
Here is an example of the power of editing:
On the left we have a linear image and on the right an edited image:


How to get started with astrophotography editing?
The first thing you’ll need to know is which software you can use for your editing. There are many choices some better than others, some free and some paid for. I’ll explain what software I use and explain why. I’ve also made some astrophotography editing tutorial videos which I will link to so that you can learn more about how I edit my astroimages.
Essential Software for Astrophotography Editing
After trying most of the astrophotography software available, especially the free options and some of the paid ones, I will give you my opinions on which are the best for beginners and more advanced astrophotographers.
What is the best free software for astrophotography editing?
What is best for me may not be best for you as we all have different preferences. But, I think I can say that of all the astro software I’ve tried for editing my astrophotos I prefer the following:
- Siril (Free)
- Photoshop (Monthly subscription)
Dedicated software:
- Pixinsight (about 300 Euros)
- Seti Astro Suite (Free)
- Startools (Paid)
General software:
- Photoshop (Paid)
- Gimp (Free)
- Affinity Photo (Paid)
How to improve astrophotography images without Photoshop?
Understanding the Astrophotography Editing Workflow
Initial editing adjustments:
My first editing adjustments include the following: colour calibration, background extraction and green noise reduction. I usually do these in Siril after I have my stacked linear image.
Exporting to other image editing software
Once I have done the above adjustments to my image I export to editing software such as Photoshop. I have been using Photoshop for many years and like the way I can stretch my images and work on colour balance and noise reduction. I am beginning to look at alternatives and many suggest that I should switch to the astro dedicated software Pixinsight. For now, I am using Photoshop in conjunction with other tools to edit my astrophotos.
How to Edit Astrophotography using Core Techniques
Once you’ve captured your raw astrophotography data, the real magic begins: image processing! Think of it like developing film in a darkroom, but instead of chemicals, we’re using software to transform that raw data into a stunning final image. Here are some of the core editing techniques we use to bring out the beauty of the cosmos:
Histogram Stretching: Bringing Light to the Darkness
Raw astrophotography images often look surprisingly dark, sometimes almost completely black. Don’t worry, your precious photons are still there! Histogram stretching is usually the first step, and it’s like turning up the lights in a dimly lit room. We’re essentially telling the software, “Hey, that faint glow? That’s actually important data! Let’s make it visible.” We do this by adjusting the black, white, and mid-points on a graph called a histogram, which represents the brightness levels in your image. It’s a fundamental step in revealing those faint nebulae and galaxies hidden in the darkness.
Curves Adjustment: Fine-Tuning the Details
While histogram stretching is like using a dimmer switch for the whole room, curves adjustments are like having individual spotlights for each part of your image. Curves give you much finer control. You can selectively brighten or darken specific tonal ranges – maybe you want to bring out the faint outer arms of a galaxy without blowing out its bright core. It’s all about carefully shaping the light and contrast to reveal the intricate details.
Watch my video about curve stretches to find out more about the different kinds of stretches you can use to enhance your images:
Color Balance and Saturation: Painting the Cosmos
Astrophotography data often needs a little help in the color department. We need to calibrate the colors to achieve a natural-looking result (or sometimes a more artistic interpretation!). This involves adjusting the balance between the red, green, and blue channels – think of it like adjusting the color knobs on an old TV. We also control the saturation, which is the intensity of the colors. Do you want those nebulae to really pop, or do you prefer a more subtle, natural look? It’s all up to you!
Noise Reduction: Smoothing Out the Grain
Because we’re often pushing our cameras to their limits with long exposures and high ISO settings, astrophotography images tend to be noisy. Noise looks like a grainy texture, and it can obscure fine details. Noise reduction is like gently blurring away that graininess, revealing the smoother, cleaner signal underneath. It’s a balancing act, though – too much noise reduction, and you’ll lose those precious details! Check more about noise reduction as well as other processing techniques here.
Sharpening: Bringing Out the Crispness
Sharpening is like focusing a blurry lens. It enhances the fine details in your image, making stars appear crisper and nebulae more defined. But be careful! Over-sharpening can create ugly halos around stars and make the image look artificial. It’s all about finding that sweet spot where the details are enhanced without introducing unwanted artifacts.
Star Reduction: Letting Nebulae Shine
Sometimes, the stars themselves can be a bit too enthusiastic! In many astrophotos, especially wide-field shots, bright stars can dominate the image and hide the fainter details of nebulae and galaxies. Star reduction is like gently dimming those overly bright stars, allowing the more subtle structures to shine through. It’s like giving the nebulae and galaxies a chance to take center stage.
Gradient Removal: Dealing with Uneven Lighting
Gradients are those annoying, uneven brightness variations that often creep into our astrophotos. They’re usually caused by light pollution, moonlight, or even reflections inside the telescope. Think of it like a spotlight shining unevenly across your image. Gradient removal tools help us even out that background, creating a more uniform and pleasing canvas for our celestial objects.
Removing Artifacts: Cleaning Up the Mess
Astrophotos can be messy! We often encounter things like hot pixels (stuck-on bright pixels), satellite trails (streaks of light from passing satellites), and dust shadows (dark spots caused by dust on the sensor or optics). Removing these imperfections is like cleaning up a messy room – it’s an important part of making the final image look its best. It’s the final polish that makes everything shine.
Advanced Techniques:
Masking: Using masks to selectively apply adjustments to specific areas of the image.
Deconvolution: This improves details by increasing resolution and clarity of the image. Deconvolution tries to reduce blurring in an image and reconstruct what the sharp image looks like.
HDR Composition: Combining images of different exposure lengths to capture a wider dynamic range. I’ve used this process with the Orion Nebula where the core of the nebula gets blown out with only about 30 seconds of exposure, but the finer details require longer exposures of several minutes.
I took a series of images with a 30 second exposure time and others at 3 minutes. After stacking the longer and shorter exposures separately, I made initial adjustments to the two stacked images and then combined them into one image using the shorter exposures for the core and the longer exposures to bring out the details in the dimmer areas of the image.
Starless Processing: Techniques for processing nebulae and galaxies separately from the stars. I use StarXterminator from Russel Croman as a plugin added to Photoshop to remove the stars. I also create a star only image in a separate layer. After editing the starless image I blend the two images together adding the stars as I see fit.
Specific Software Workflows: Detailed steps for using particular software packages (PixInsight, Photoshop, etc.)
Combining Different Data Sets: (Ha, OIII, SII, LRGB, etc.)
Pixel Math:
This tool which exists in software such as Siril or Pixinsight, enables you to compose an image from different mathematical combinations of RGB channels or channels containing signals made up of HA or OIII or Sulphur obtained during narrowband imaging with special filters.


