
Table of Contents
Astrophotography is both an art and a science. Photographers capture the same data but process it in different ways. This is the creative part of astrophotography. To excel at this pastime, one must create good astrophotography flat frames. You’ll need to master scientific concepts and photographic techniques alike.
In this post, I will explain why, in astrophotography, knowing how to do flats is important.
Why Are Astrophotography Flat Frames Important?
Flat frames play an important role in post-image processing. They help fix any light source inconsistencies caused by factors like dust. This can collect on the optics of cameras and telescopes. Certain areas of the photo may show vignetting or irregular brightness spots. Flats make it easier to get beautiful images.
Check out this explanation of astrophotography flat frames and how they can help you improve your images.
Creating astrophotography images that capture the beauty of our universe is not easy. It’s important to understand all aspects of this craft, including flats! What exactly are they?
Flats are photographs taken with a constant light source throughout the entire frame. They must be taken using the same physical setup as your astrophotos. The telescope, the lenses, and the filters should remain as they were when the photos were taken. You will need to change the shutter speed to get a correctly exposed flat.
Adding astrophotography flat frames to your photography workflow helps correct many issues. These include dust particles and uneven lighting, which can reduce photo quality.
Why is dust a problem in astrophotography, and how can it affect your images?
Sources of Dust
All photographic equipment and lenses are affected by dust. Your telescope or camera may collect dust from the atmosphere, depending on where you use it. Windy and dry areas can be a problem. In spring and summer, pollen can also get onto your lenses. No matter how careful you are, small particles and debris will build up in hidden areas of your optics.
How does dust affect astrophotography?
Dust can affect your astronomy images in several ways. Spots, streaks, dim areas, and dust motes are common. Understand how these happen, and you may be able to prevent problems before they occur.
Small particles of dust can reduce the reflected light from your mirrors. This can cause a dimming of the light in certain places in your image. Larger dust particles cause more serious issues. These are more noticeable and can include dust motes. These are often circular, darker areas that can spoil your pictures.
Cleaning techniques
There are several ways to clean your camera’s or your telescope’s optics.
You can use a blower, a brush, or a microfiber cloth to remove dust particles. Learn more about how to clean your telescope’s mirrors here.
Solve your dust issues with this convenient camera cleaning kit:

- 14 cleaning tools, including blower
- Less than $20
- Easy to carry
- Minimize dust problems
Dust prevention methods
It’s better to prevent problems with dust before they affect your images. I always try to replace my lens covers and never leave anything open to the elements. Dustproof boxes and covers can help. If you can keep your equipment in a dust-free environment, this will also make a big difference.
Sometimes, though, no matter how hard we try, dust will find a way in! It’s then that your flat will come to your rescue!
It is possible to do without them if you have a clean optical system. But at some point, you’ll need to learn how to take flats.
So how do we do that?
How to Take Astrophotography Flat Frames
To get a consistent and evenly lit image with your telescope or camera, cover the lens with a white T-shirt. It is important to take at least 10–15 flats. You do not need to take the flats in the same location where you took your astrophotos.
Stacking software uses these flats to create a master flat by calculating an average. The master flat can then correct the final image and remove any defects.
Achieving clear and high-quality images of the night sky can be a challenging task. But, by utilizing a master flat, it’s possible to remove any variations in lighting. Your images will look so much better!
A step-by-step guide to taking flat frames
Here are the steps to follow:
The White T-shirt Method
- You can take flats either before or after your imaging session. Be careful not to change any settings or anything in your setup or optical path. This includes camera settings. The one exception is that you will need to alter the shutter speed to change the level of exposure as the flat is taken in brighter conditions.
- Point your telescope or camera towards a bright point in the sky. This cannot be done at night because you need a light source.
- Take a few pictures with the aperture of your telescope covered with a white T-shirt.
- Upload your pictures to your laptop or computer.
The Light Panel Method
Follow step 1 as above, then:
2. place the light panel in front of your telescope aperture or camera lens
3. take some pictures.
4. Upload the astrophotography flat frames to your computer or laptop.
You can use a laptop with a bright white screen as your light source. This can be a good alternative to the methods above. The steps would be the same as for the light panel.
This is a cheap and reliable tool for taking flats with this method:

- 6 brightness levels
- LED
- Wireless
- Works for 4-6 hours after charge
Here is another clear explanation of astrophotography flat frames on YouTube:
How to use the flats
After you have the flats on your computer, you can use a program like Deep Sky Stacker. This software will average out the flats and create a master flat.
When you have the master flat, you can stack your astrophotography images. I use Siril to stack my images, but there are alternatives. You can use Deep Sky Stacker, Pixinsight, and many more.
The stacking software uses the master flat to correct for problems in your optics. Dust motes and vignetting are removed, and your image looks better.
That’s the theory. It seems quite simple, though I have found it difficult to take flats. It does need practice.
Calibration Frames for Astrophotography
There are other types of calibration frames we use for astrophotography. These are dark frames and bias frames.
Dark frames remove heat and electronic noise created by the sensor to ensure crisp images. To take things even further, bias frames are helpful for reducing any noise seen in the camera itself.
Flats need to be retaken when your optics change. If you use different filters, you must take flats for each. The results will improve the quality of your astrophotos. Flats will give you cleaner images which will be easier to process.
What are the most common problems with taking flats?
There are several problems that may make taking flats for astrophotography difficult.
The first problem is one that I have faced. It can be quite difficult to get even lighting. This can cause vignetting in your image.
The only way you can correct this is to experiment with different light sources. You may need to move the light source. Light panels are more consistent than aiming at the sky. Test what works best.
Another problem is under- or overexposure. This does need testing. Try changing the shutter speed to vary the exposure.
If the flat is under- or over-exposed, it will not correct the image as you wish.
Another problem is often the setup. You must use the same physical setup as you used for your photographs. You cannot change anything or the flats will not work.
Experiment with taking flat frames
For a while now, I have been using my ZWO ASI533 MCPRO camera with my telescope and taking pictures that I have been taking, but recently I have noticed increasingly annoying dust motes affecting my pictures.
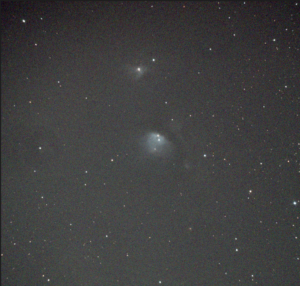
Above is a stacked image I took of M78. i don’t know if you can see it but there are two dust motes. One is half way down on the left side of the image and the other is towards the top right of the image. When these get stretched in final processing they get worse and no matter how hard I try I can’t remove them.
The answer to this frustration is to shoot some flats and finally get to grips with this skill, as I have avoided it for a long time.
How did I take flats?
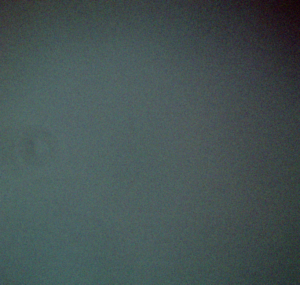
My first step was to use an iPad as a flat-panel light source and turn down the intensity of the light. I experimented with some test shots and found that I could get a flat with the histogram about a third or a little more along from the left and can see the dust motes in the exposure. Here is one of my flat frames:
And here is how the histogram looks:
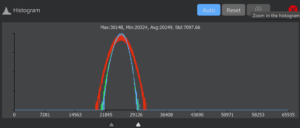
I think this looks right to me but I have since discovered that I need to take dark flats which are taken exactly the same way I take the flats except with the cap closed and no light entering the telescope. In other words, the exposure time and camera gain (259 in my case) should be exactly the same. Why 259 gain? Because that is what I used to photograph my astro target. Although I don’t think the temperature is important for this dark flat, I am cooling the camera to my usual imaging temperature of 0 degrees.
OK, so let’s take some dark flats.
I found it quite easy to take the dark flats because each frame was only one second exposure at a camera gain of 259 as before. I took 20 of these dark flats and then proceeded to stack them to produce a master flat. I also did the same with the flats. The programme I use for stacking is Siril, which is fast and completely free.
After stacking the light frames with the flats and flat frames in Siril, the stacked image did look cleaner and I couldn’t see the dust motes but this was before much stretching had taken place.
Overall, I think the flats have removed most of the problem with dust. Next, I shall also add darks which I have not been doing.


