
Table of Contents
Looking for the perfect shot of the night sky is a difficult task. Selecting the right filters for your shot can also be very confusing. You need to understand which astrophotography filters are best for your astronomical target. The seeing conditions of your sky location also affect which filter you should use. In this guide, we’ll discuss the basics of choosing astrophotography filters. This will help you get amazing astrophotos!
Why do we use Astronomy Filters?
There are many reasons why we want to use filters for astrophotography. These include:
- To help bring out contrast and detail in your photos, enabling you to capture the night sky in its truest form.
- Different filters can enhance various astronomical objects. This can help you create stunning images or improve observation.
- These astrophotography filters block out certain wavelengths of light. This allows you to bring out features that would otherwise be difficult or impossible to see.
- Filters can reduce the effects of light pollution on your images. This is a major reason why we use them in astrophotography.

- Great value filter at less than $30
- UHC
- 606 reviews on Amazon
- 1.25- and 2-inch versions
Types of Astrophotography Filters Available
Astronomical filters come in many different types. Some of the most common astrophotography filters include light pollution filters. These help to improve contrast. Narrowband filters and optical band-pass filters are two other important types of astrophotography filters.
Light pollution filters reduce light entering your camera from artificial sources. This includes streetlights. This reveals hidden detail in your night sky photos. There are two main kinds of artificial light that affect astrophotography. Traditional sodium street lights are very orange. More modern LED lights are a new problem. So, light pollution filters must be effective at blocking both of these sources of light.
Learn more about light pollution and the effects it has on astrophotography.
Please note that no filter is perfect! Different filters that claim to do the same thing may give quite different results. I have also seen some claim that filters often vary in their quality. One such person is Cuiv the Lazy Geek, a popular astrophotographer on Youtube. He says that two filters of the same type from the same manufacturer may block light differently.
Narrowband filters block out specific frequencies of light. This enhances faint deep sky objects. They pass one, two, or three wavelengths of light. They only pass the light we see in nebulae, galaxies, and other objects. They also block a lot of light pollution.
Narrowband filters usually pass only Hydrogen Alpha, Oxygen III, and Sulphur. Note that these are names of gases present in the deep sky object. These gases create different wavelengths of light. This is why one object appears red if it has Hydrogen Alpha, or Green/ Blue if it has Oxygen III. Sulfur is also red.
Optical band-pass filters may enhance contrast for planetary photography.
There are also sky glow filters suitable for Moon glow and to reduce glare.
Another kind of filter is used to block Infrared or UV sources as cameras are often sensitive to these. They are not usually necessary for astrophotography but sometimes used.
Depending on the type of Astrophotography, you may want to use a filter wheel. A filter wheel changes the filter automatically. This is necessary depending on what wavelength of light you want to focus on.
Many serious astrophotographers use monochrome cameras with colour filters in a filter wheel. Why? Because a mono camera is usually more sensitive. Its photocells are not divided into Red Green or Blue like a colour camera. So, to get a colour image it is necessary to use at least three filters. The Red, Blue, and Green filters are used in turn. After taking pictures with the filters, they are combined into one image.
A colour camera is much more convenient and needs no colour filters. They are integrated into the sensor and cover each photocell.

- HA pass
- Oiii pass
- For OSC cameras
- 2 inch (1.25 also available)
- Great value!
How to Select the Right Filter for Your Needs.
Choosing the right filter for astrophotography is important, but difficult. It depends on the type of objects you are looking to capture and the equipment you use.
Your camera’s sensitivity, focal length, and field of view will determine which filter you use.
Also, take into account the amount of light pollution in your area. You also need to know about your astronomy target. What kinds of light does it emit? What kind of light do you need to block to improve your photos?
Here are some guidelines which I have learned doing deep sky astrophotography:
Emission Nebulae
The best astrophotography filters for emission nebulae are broadband RGB filters or narrowband filters. A good idea is to image in RGB and then add data captured with a Ha filter. Then, add this to the image to highlight the area of hydrogen gas in the nebula.
Narrowband filters with Oxygen iii and sulfur can also be used. Many nebulae contain these wavelengths. Particular targets may have more or less blue oxygen light than others.
Reflection Nebulae
Narrowband filters are not a good idea for reflection nebulae. This is because some of the reflected light will be blocked. Thus, a broadband filter can be used so that a wider spectrum of light can be captured. This will make for a much better image.
Galaxies
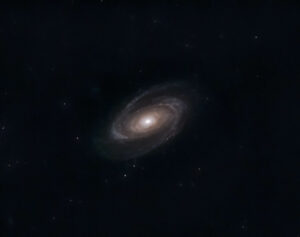
These are broadband targets, so a broadband RGB filter should be used. However, I have imaged a number of galaxies, such as M81 and M82 in Narrowband and then added this to an RGB image.
M82 is the Cigar Galaxy and my image below shows it in Narrowband. There is quite a lot of hydrogen alpha in this galaxy and other galaxies are improved by some Ha imaging. At least this is what I have found adding Ha to my galaxy images. So, it is worth taking extra images with a Hydrogen-alpha filter. This will highlight nebulae that are present in the galaxy you are imaging.
It has taken me quite a bit of trial and error to understand which filter to use with different deep-sky objects. Testing with your own equipment is always the best way to learn. And this is also true for filters. You cannot always trust the theory alone. Astrophotography is very experimental and definitely creative!
With practice, you’ll understand how different types of astrophotography filters work. This will help you capture breathtaking photos of the night sky!
Different Methods of Applying Filters in Astrophotography
There are different ways to use astrophotography filters to capture amazing night-sky photos. The method you use will depend on the type of filter. Some filters must be placed between the telescope’s eyepiece and the camera lens. Others need to be attached to the camera’s lens. Some astrophotographers even combine several types of filters for more detailed results. Be sure to have a reliable filter system and know how to use it. This is essential before venturing out into the night sky with your camera!
Make sure you have a range of filters. These should include nebula filters, band-pass filters, and light pollution filters. Often times these filters can be very specific for different types of telescopes. First, sort through your filters and identify which will be most useful for your target. Then, you’ll need to determine the proper way to use it.
Some filters can be inserted either on the camera lens or between the sensor and the lens. These include nebula or band-pass filters. I have also found clip-in filters quite convenient for use with a DSLR. When I attached my DSLR to my telescope focuser I used a clip-in filter in front of the camera sensor. I also sometimes used a small filter screwed to fit between the focuser and the camera sensor. In this case, the telescope becomes the lens. See more here about how to do astrophotography with a telescope.
Now that I am using a dedicated astro camera, (ZWO ASI533 MC PRO), I screw a filter to a nosepiece. This attaches in front of the camera sensor and this fits into the telescope focuser. I use either of these two filters with this camera:
- An Optolong L Pro broadband filter
- A ZWO Duoband 15nm filter captures Ha and Oiii and has a bandpass of 15nm.
- I am now also experimenting with using no filter at all with reflection and galaxy targets.

- I use this filter and love it!
- Light pollution RGB filter
- Reflection nebulae and galaxies
- Less than $200 (price may increase)
Comparing Images I’ve Taken with Different Filters and the Lessons I’ve Learned
Like everyone else who ever tried astrophotography, I made my share of mistakes at the beginning. Several of these mistakes involved my use of filters. It was only by making errors and trying out different filters for different situations that I managed to learn how to choose the right filter.
So in this section, I’ll show you some of the results I got when imaging. I have experimented on the same target with different filters. I hope that this will help you when you want to make your own decisions and choices. Remember, your situation and your equipment might be very different from mine.
Bode’s Galaxy Image in RGB
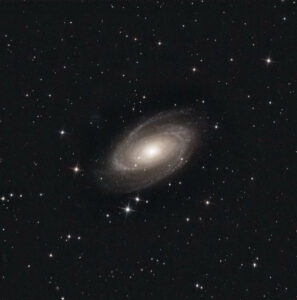
From the above, you can see that the RGB filter collected much more light. It also gave a generally satisfying image of the galaxy. The below image of Bode’s Galaxy, taken with a ZWO duo band filter, gave a very different result. I also like the second narrowband image because there are highlights where nebulae glow with hydrogen alpha. Also, details become clear in the arms of the galaxy, for example. There is also quite good colour here.
Bode’s Galaxy Image in NB
Astrophotography is creative because each image has a unique style. Even with the same data, two people would create a very different image. Filters are another way that we can form the kind of image we want to see. I like subtle colours rather than over-saturated ones. Some pictures I see are like candy-colored astropics. I want mine to be more natural and truer in showing the marvels that lie awaiting our discovery above.
So, remember, try different filters and experiment until you understand how to get the results you want. Good luck with your imaging adventures!


