
Astrophotography can be a very rewarding discipline because capturing breathtaking photos of astronomical bodies such as stars, galaxies, and planets is extremely challenging. Yet, learning astrophotography can be difficult, especially if you’re just getting started. The 500 Rule astrophotography formula is one of the best methods for amateur astrophotographers to calculate the length of exposures they can take to photograph a target without a tracking device.

It’s difficult to say exactly who came up with or first suggested the astrophotography 500 Rule. But the rule has been around for a while, and astrophotographers have long acknowledged and used it.
The 500 rule astrophotography formula can help the astrophotographer take crisp, detailed pictures of celestial objects. According to the rule, you should divide 500 by your camera lens’s focal length to obtain the maximum exposure time in seconds in order to prevent star trails, which are streaks that appear in long-exposure photos of stars. As part of the 500 rule astrophotography calculation, we also have to take into account the size of the camera sensor.
For instance, if you were using a full-frame DSLR camera and a 50mm lens, you would divide 500 by 50 to get 10. This implies that star trails won’t appear when your image is exposed for a maximum of ten seconds. You would need to multiply the focal length by the crop factor to get the effective focal length (75mm) and then divide 500 by 75 to get the maximum exposure time (6.7 seconds) if you were using a crop-sensor camera with a 1.5x crop factor and the identical 50mm lens.
The 500 rule is a general guideline, and it’s important to bear in mind that other factors, such as the celestial object’s altitude and the quality of the image, can also affect the maximum exposure duration.
One of the most popular astrophotography objects, the Milky Way, may be captured in exceptional detail using the 500 rule astrophotography formula. You’ll need a wide-angle lens with a large aperture (f/2.8 or wider) to let in as much light as you can to shoot the Milky Way. What’s more, you’ll need to choose a spot free of excessive light pollution, darker skies will enhance your image and make it easier to process the picture later.
Use the 500 Rule to establish the maximum exposure time after assembling your camera and lens. Then, play with various ISO values to achieve the ideal balance between exposure time and image noise. Generally speaking, using a higher ISO will let you utilize a shorter exposure time, but it will also make the image noise more noticeable. a lower ISO will result in a higher-quality image with less noise, but you will need to extend the exposure time. Check out this page to find out more about the camera settings you need to improve your astrophotos.
My Experience With the 500 Rule Astrophotography Formula
During the years since I started astrophotography, I have learned to use the 500 rule astrophotography formula only when I needed to take photos without any tracking, such as when on holiday or if I travel with just a tripod and camera.
It is very possible, I was surprised to find that amazing images can still e taken with relatively short exposures of 10 seconds or so. I was even more surprised, then, when I went to Bali last year and took only my DSLR camera with me. I placed it on a sturdy tripod and attached my Samyang 130mm or Canon widefield 35mm lens and proceeded to test what was possible.
I imaged the Carina Nebula and the Orion complex capturing a wide-field image of both the Orion nebula and the Horsehead Nebula. I think that both of these came out brilliantly despite using exposure times of only 5 seconds! Of course, when doing this we need to extend the total integration time and so I took hundreds of images before stacking and processing them.
Below you can see the two images I managed to create with just my camera, (Canon 600D modified for astro), tripod, and lens.
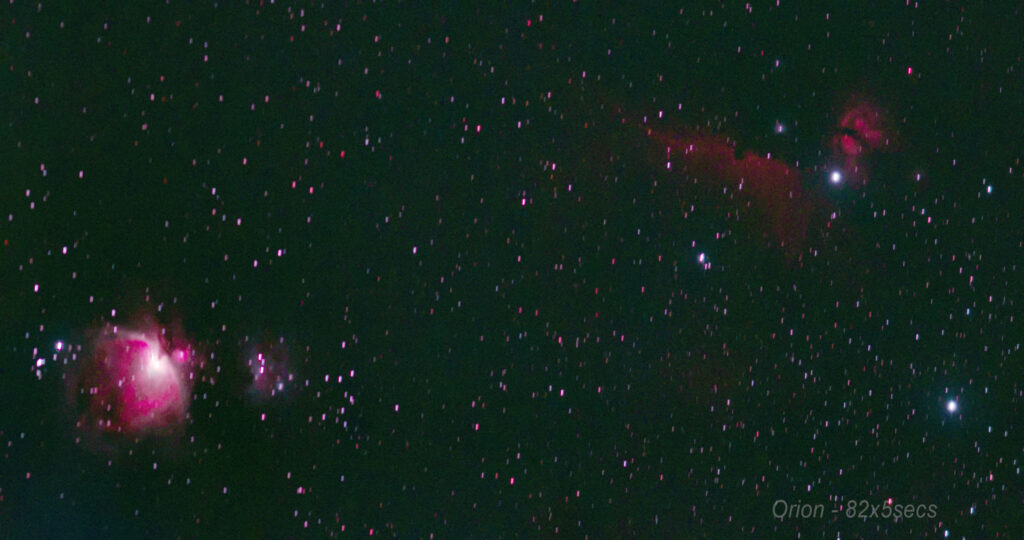
The image of the Orion complex above was taken with a light pollution filter (Ioptron L Pro) at 5-second exposure. I took a total of 820 shots. This is a total integration time of 68 minutes or just over one hour.
If you look closely or zoom into the image above you can definitely see star trails even at 5 seconds! The lens I used for the above image was a 130mm Samyang lens. The camera is a crop sensor. So if we apply the 500 rule:
500 divided by (130 x 1.5) = 500 divided by 195
= 2.5 seconds
In other words, according to the formula, I should have halved my exposure time to avoid the star trails. When I decided to take this shot I forgot to take the crop factor into account. But even so, this would still have meant at 3.8 seconds and longer star trails should have occurred, and they did as we can see in the shot above. Also, as the night went on I noticed that Orion was getting lower in the sky and was heading towards the horizon so that would have increased the star trailing.
I also imaged the Carina Nebula, as I was in the Southern Hemisphere for the first time since doing astrophotography. How exciting is that?
Below you can see my image, which I find very satisfying, of this famous object:
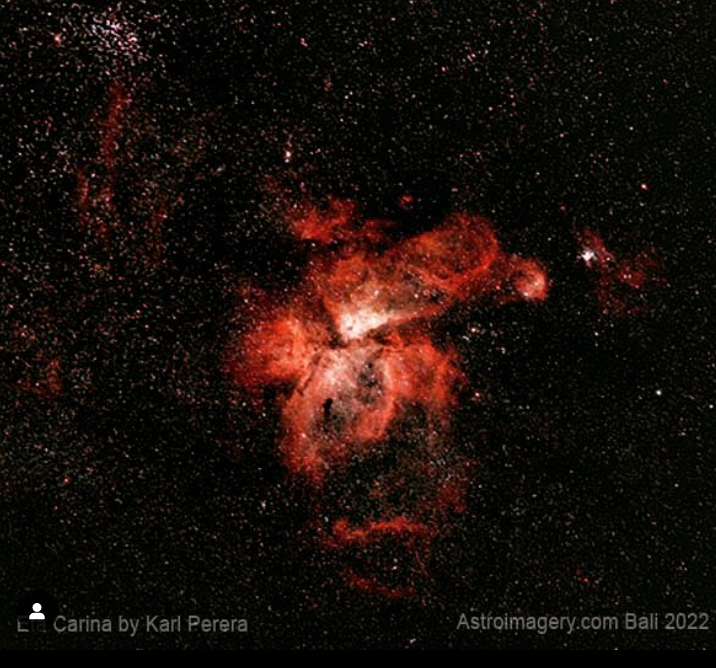
The above image of the carina Nebula was taken with my DSLR and a widefield lens with 5-second exposures with a total of 485 photos taken. This is a total integration time of 40 minutes only.
The other thing you may notice from my image is that there don’t seem to be noticeable star trails. Why? Well, I took this image with a wide-field lens with a focal length of just 35mm. Lower focal length means less magnification which is why you can’t see any star trailing in the image.
As I hope you agree, this is quite a good result isn’t it for so little integration time and such short exposures? It just goes to show that you don’t necessarily need to take long exposures of many minutes to get a good image.
Using a tracking mount to keep your camera pointing at the celestial object throughout the exposure is another helpful astrophotography technique. You can use a longer exposure time with a tracking mount without creating star trails, which can produce even more intricate and beautiful photographs.
A tracking mount will therefore make it unnecessary to use the 500 rule and I have found my tracking mount, an Ioptron CEM 26 Equatorial mount, can track objects for approximately 2-3 minutes with only minimal errors. If you want to take even longer exposures then auto-guiding is the answer. With this technique, I have extended the maximum exposure time that I can accurately track objects to 20 minutes and beyond.
In conclusion, astrophotographers can take advantage of the 500 rule astrophotography calculation, a simple but effective tool, to obtain clear, detailed photos of celestial objects. You can take your astrophotography to the next level by following this rule and experimenting with different camera settings to produce stunning images like these of the night sky. Always be persistent and patient and take some time to appreciate the beauty of the universe in the images you capture.


