
Table of Contents
I have learned a lot in the time I have been doing astrophotography. I know now that this is a challenging process that requires knowledge and experience in many areas which are new to me. Having succeeded in solving some of the basic beginner’s mistakes and having solved a bucketful of problems, I know that what I have learned can help you in your journey in astrophotography.
Astrophotography processing software includes stacking and then processing in a programme such as Photoshop. There are many different programmes and software that can be used. The image processing involves stretching the image, adjusting the level of the background, adjusting contrast and colour, and reducing noise.
On this page, I want to focus on what I have learned about astrophotography image processing. This will include the different astrophotography processing software I have used and what I think of them. As my astrophotography image processing skills develop, you can learn from my mistakes and solutions and then, hopefully, go off to explore new areas and develop your own imaging and post-processing style.
Astrophotography Processing Software I’ve Used
So far, I have found the following programmes helpful and will continue to use them:
- Siril (Free stacking and image processing)
- Sequator (Free stacking only)
- Registax (Free stacking of planets and online image processing)
- Deep Sky Stacker (Free astrophotography processing software that stacks your images)
- Pipp (a free programme that converts video to images for stacking in other programmes)
- Photoshop (I use the CC version)
Let’s look at each of these and how they can help you with the processing of your astrophotography images. Later in this post, I will also talk about other astrophotography processing software, such as Astro Pixel Processor and Star Tools, which I have tried but do not use at present. I’ll explain why.
One problem I ran into early on was that my laptop was not able to run some of these programmes quickly and often crashed. I have discovered, for example, that Star Tools and Astro Pixel Processor, as well as Photoshop, needed more resources than I had on my laptop. I upgraded my RAM from 4MB to 16MB and replaced my hard disc with an SSD drive and now my laptop is fast and can handle these image processing programmes.
Adobe Bridge
One programme I have discovered recently is Adobe Bridge.
I really like this software for several reasons. First, it allows me to sort through my images and review them quickly to see which images I need to reject or accept. There is a handy zoom tool in review mode that shows me the existence of any star trailing and how bad it is. If it is too bad, I label it as rejected, and later can delete them or move them so that I have only good-quality images to stack.
Another feature of Adobe Bridge I use is collections. I can add any of my astrophotography images to my collections no matter where they are and they appear on the menu in the lower-left pane under collections. I don’t need to search for certain pictures anymore; they are all there when I want them.
Photoshop CC
I have been using Photoshop since upgrading my laptop and hoping it will take my editing to another level. Below is an early result when using Photoshop (second image) to edit an image processed in Siril soon after starting to process astrophotography images.

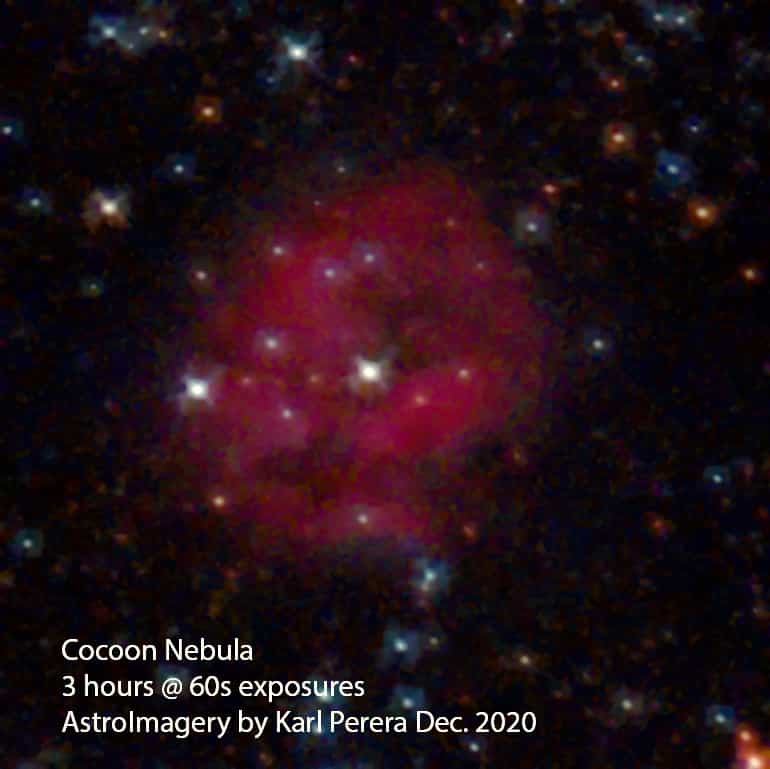
The Cocoon Nebula exposures of 60 seconds were stacked using Deep Sky Stacker and then processed in Siril. This resulted in image A. In Siril I did color calibration and stretched the image. Image B is the result of processing the image in photoshop to remove the noise, reduce the stars and remove the gradient.
I am sure you’ll agree that this image is far from perfect, but I can clearly see a difference in the clarity of the nebula.
I have also loaded the highly recommended Astronomy Tools Actions into Photoshop and I like the results I am seeing so far!
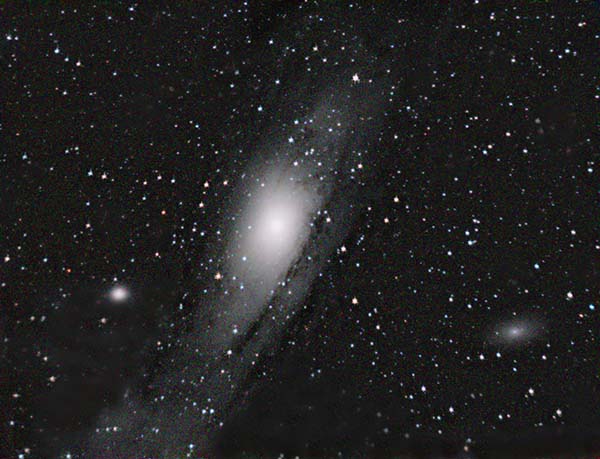
Below is the difference that using Photoshop and the Astronomy Tools made to this image of the Andromeda Galaxy from early in my astrophotography journey.
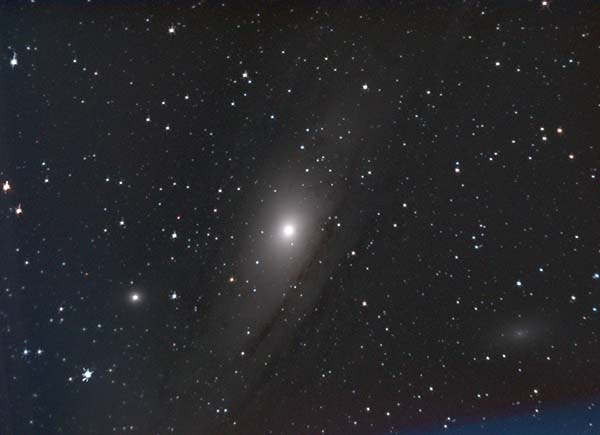
I have to say that I was not happy with this image and have struggled with it. I will come back to M31 again and try some experimentation to improve it. Bear in mind also that this was my first year of astrophotography and now I have improved both my acquisition skills and my post-processing skills so look out for updated pictures of this target again very soon.
Anyway, the original photo before processing in photoshop lacked details as you can see around the core and in the small neighboring galaxy.
The main reason why Photoshop helped to bring out more details in my shot of Andromeda is that it allows me to stretch the image, boost contrast and reduce the noise. Since this photograph was taken about a year into my Astro imagery journey, I have improved my image processing and photography skills and upgraded my equipment. Newer images of the Andromeda Galaxy that I have taken will be added to this site soon.
Image-Stacking Software
Software is required to align and stack together many photos that we take of an astronomy target such as a nebula or a galaxy. Often, calibration frames, for example, dark frames, are added to the programme, which uses them to extract some of the noise from the images and produce a cleaner-looking stack.
Once I have the stacked image, I open it in Photoshop and perform one or two stretches, level checks, and balance the colour in the image. This is followed by a workflow that includes contrast and brightness adjustment and noise reduction. The colour in the final image can be boosted using saturation and vibrance to taste. Some like very bright and colourful astrophotography images, but I prefer to tone it down a little to something more natural-looking.
There is really only one way to improve your image processing skills, and that is through practice. You can always stop, go back, and redo an image later to obtain a better result.
All in all, I have found the best tool for image stacking to be Sequator, and for processing the image, I prefer to use Photoshop, but many prefer to use Pixinsight, which is much more expensive and requires time to learn.


