
Many people, like myself, began this journey into astrophotography with a telescope and found that it would be a great idea to photograph what they saw. The reality of moving from observing to photographing the images from a telescope involves a lot of time and experimenting to get it right. It is a steep learning curve!
Let’s suppose that you have a telescope and have made your first observations with it. You are probably wondering how to set up a telescope for astrophotography. Well, stick with me here, and I will explain how you can get started with your equipment and set everything up so you can take your first images in this amazing hobby of astrophotography.
To set up a telescope for astrophotography, you first need to attach a camera to it and check if it is possible to focus on stars or the moon. Your telescope may need modification to allow you to use a DSLR. You’ll need a sturdy tripod or mount and set your camera correctly for night photography.
The above sounds quite straight-forward, but believe me, this is not your first time trying to do astrophotography. You’ll really only learn how to do this by following what I explain here, doing research online, and trying it yourself with your equipment.
So keep reading as I explain each of these steps and guide you along so that you can begin imaging in the shortest time possible and avoid any serious difficulties. It’ll be like having me alongside you as you try to solve the next challenge. I’ve also written this guide for you if you need some help deciding what you need for astrophotography, check it out now!
Astrophotography with a Telescope: How to attach your Camera
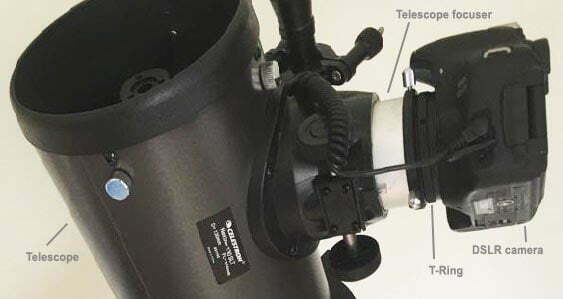
This was one of the most tricky things to solve for me at the start because my Canon DSLR did not connect to any of the parts of my telescope. The solution was to buy an adaptor (T-ring) that screws to the camera face where normally you would attach the lens. This allowed the camera to correctly interface with the wide opening of my focuser, where I could attach the camera to my Newtonian reflector (Celestron 130slt) telescope.
You might be wondering: What is the best telescope for astrophotography? If so, go visit this page I’ve written to answer this: do you need a special camera for astrophotography?
Once I attached the camera, I found that I could not reach focus. I needed to modify my telescope because, like many scopes, it is designed for visual use rather than astrophotography.
Is your telescope suitable for astrophotography?
As we have just seen above, a telescope that is used for viewing astronomical objects may need to be modified to make it suitable as an astrophotography telescope.
In my case, for my Celestron 130slt telescope, this modification involved moving the larger primary mirror about an inch or so forward. The primary mirror in a reflector telescope is the one at the back of the telescope tube. Rather than cutting and shortening the telescope tube in order to move the mirror, here is a simple and reversible solution for this modification. Once you do this, you’ll have your own astrophotography telescope!
If your telescope is already designed for astrophotography, then when you attach a DSLR, you should be able to focus. Remember, the best way to connect your camera is to use prime focus. This way, the camera will not be at the end of a long tube, adding extra weight to your telescope. Prime focus means that you use no lens on the camera; instead, the astrophotography telescope acts as the lens, and the camera is attached to the T-ring, as in my diagram above.
If you’re confused about the wide choice of telescopes available, read my guide here, including the research I’ve done to help you choose the best telescope brand.
Perhaps you’re interested in photographing galaxies? Discover which telescopes are best for viewing or photographing galaxies here.
Piggy-backing a camera on the telescope
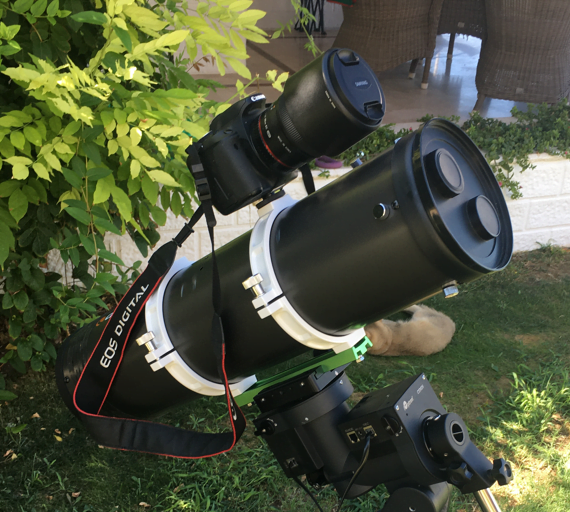
In the above photo, I show how I was able to connect my DSLR Canon 600D camera piggyback style to my astrophotography telescope. This is useful if you want to use a lens on your camera, for example, for widefield shots of deep sky objects or even for Milky Way pictures.
You can see that I chose to connect the camera by screwing it to the plate at the top of the telescope rings I bought from Sky-Watcher. Telescope rings are a secure and convenient way to attach your telescope to a mounting plate (the green piece in my photo above), and this then slides into place on the mount itself.
What is the best telescope camera to use?
There are so many choices, but for telescope photography, you should consider one of these two types of cameras:
- A DSLR camera manufactured by Canon, Nikon, or Sony.
- A dedicated astronomy camera. Examples of good brands are ZWO, QHY, and SVBony as a cheaper alternative. You should also decide whether to get a cooled or uncooled camera.
Having tried a DSLR camera and then an astronomy camera by ZWO, in my opinion, the best telescope camera is a dedicated cooled astronomy camera. These will cost about 700 dollars or more, but a good DSLR can cost as much, if not more.
How to set up a telescope
There are two main kinds of telescope mounts, and it is important to know which kind you have, as this will change how you need to set it up.
The first kind of telescope mount is Alt-Az, and the second kind, which is more complex to set up, is the equatorial mount. I started with an Alt-Az and then upgraded to an equatorial one.

Before setting up your telescope, you need to understand how it operates. Here is a brief description of the two kinds of telescope mounts: the AZ-Alt and the equatorial telescope mount.
The basic difference between an Alt-Az mount and an equatorial one is that the first has a mount that can move in two directions, horizontal and vertical. Therefore, it can go to any point in the sky but cannot follow the same exact path that the stars and other celestial objects follow.
An equatorial mount rotates around a point that needs to be set parallel to the earth’s celestial north pole. The rotation of the mount is opposite to the rotation of the objects in the sky, such as the stars and other deep-sky objects, and therefore counteracts this movement. In essence, the equatorial mount freezes the sky and enables us to image objects for many minutes at a time with no star trails visible in the image.
By using an equatorial mount, I have managed to take sub-exposures of up to 15 minutes or more with nice round stars. When I used my alt-az mount (the Celestron 130slt goto telescope), I could only manage 30-45 second sub-exposures and therefore had to take many more photos to image my object. Longer sub-exposures make it possible to save space on computer storage because you have fewer photos for the same total integration time. Longer sub-exposures can also bring out more detail in the final image when all the photos are stacked together.
How to Setup a telescope with an ALT-AZ Mount
This kind of mount is one that beginners often start with as it is simpler to set up. The only thing you need to do to set it up is align the telescope with two or three stars so that the internal computer has a map of the sky and knows where it is pointing. This alignment normally involves placing the star in the eyepiece centre and then using the Goto hand control to enter each alignment point.
This is all that needs to be done to set up an Alt-AZ mount.
How to Setup a telescope with an Equatorial Mount
This kind of mount is usually more expensive because it is designed to track the motion of the stars more accurately than an Alt-Az mount and can help you achieve longer exposures without star trailing.
The setup of this kind of mount involves first setting good Polar Alignment so the mount is set to be parallel with the celestial north pole around which all the stars rotate. This can be done using a small polar alignment scope on the mount or by using a programme such as Sharpcap Pro. This is currently the method I use, which enables me to align within a few arc minutes.
The mount must also be set to a zero point where it is facing the celestial north. This is done after polar alignment. The mount software needs to know the GPS coordinates of the location where you are, and the Equatorial mount is correctly polar aligned when the latitude angle is correctly set on the mount (part of polar alignment).
Taking a test shot of your target will quickly confirm that everything is set up correctly, as you should see no visible star trailing.
There is free software, as well as paid software, that can make astrophotography with a telescope easier. After gaining some experience using your equipment to take your first images, you’ll want to use a computer or laptop for imaging; it’s not necessary but can help you locate objects more quickly and image them automatically. There is also helpful software to help you accurately polarise your telescope.
How to Setup Your Camera
The main setup for your camera once it is correctly attached is to choose the appropriate settings, i.e., ISO, exposure time, pause between shots, and set manual focus and bulb mode. It sounds quite a lot, doesn’t it? But don’t worry! It gets much easier with time.
If you use a DSLR camera, you’ll need to set Manual Focus, White Balance to auto or daylight, and ISO to the best value for your camera, which you can find by looking this up online. For my Canon 600D, this is 800 ISO, but it could be 1600 ISO or some other value for the camera you have. Set the camera to bulb mode so you can shoot longer than 30 seconds. I’ve written this helpful page with more detailed information about the correct settings for exposure.
Focus is one of the most important settings to master, and it did give me a number of problems. First, find a bright star to focus on and do your best to get it as small as you can using the Live View Screen on your DSLR. A Bahtinov mask is also helpful for really pinpointing focus. You may need to check focus again after a few hours, depending on your equipment and conditions.
What Else You’ll Need to Setup for Imaging
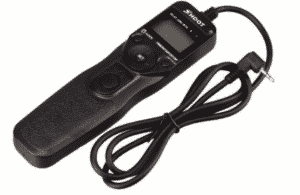
You’ll also need to set up something to help monitor and plan the images that you intend to take. This could involve an intervalometer or software such as the Astrophotography Tool.
As you progress in your journey, you may also wish to start using guiding to extend your exposure time to many minutes at a time, and this will require further setup of a guide scope, guide camera, and software such as PHD2.
In Conclusion
There are a number of things to get right before you can start astrophotography with a telescope and shoot astronomical targets successfully. Basically, this involves understanding the equipment you have and the basics of photography. This will enable you to set up your telescope and attach equipment so that you can begin to take photos of deep sky objects, and as you learn more, your images will improve step by step. Astrophotography with a telescope is really not that hard when you know how! I hope I’ve helped you gain some insight today. And don’t forget, you can contact me if you have any questions or need more help.


