
Many people sometimes wonder about taking a photo of the night sky with their camera, be it a phone or a DSLR. This is possible, of course, but to get good results, more expensive equipment helps. If you are wondering if it is possible to get started in astrophotography without spending lots of money, there is good news. I will outline on this page how it is possible for anyone to get into astrophotography on a tight budget, so keep reading.
It is possible to start astrophotography on a tight budget by using an Older DSLR camera that you already have, or you can buy one cheaply secondhand with a basic lens. A telescope with a Goto Alt-Az mount can also be purchased for around $2–300 or even cheaper second-hand.
There is more to it than this, of course, and I will go through exactly what you need to get started and discuss how to both save money and get good results with basic equipment, as mentioned above.
Use a Cheap DSLR Camera
There are many cheaper DSLR cameras you can use to start astrophotography. The best is to use either a Canon, Nikon, or Sony. The older Canons are quite cheap. I bought a Canon 600D, and it served me well, but to start with, any of these models will do. At most, you shouldn’t need to pay more than a couple hundred dollars for a secondhand DSLR, and that may include a lens.
There is a chance that you already have a DSLR camera that you can use, and if so, you won’t have to spend any more on a camera to start with.
When beginning astrophotography, the only things you should think about with any camera you decide to use are the following:
- You will need manual focus
- Your camera should be able to do 30-second exposures and have bulb mode.
- You will need a connection for an intervalometer
- You will need a live-view screen to see your photos and to be able to focus in the dark.
If you have a DSLR with the above features, then that will be enough to get started. Make sure that the camera can be connected to a tripod. Most cameras have a screw underneath the camera body for this.
Next, we will discuss lenses briefly, but if you use a brand such as Canon or Nikon, you’ll have the possibility to attach different lenses to your camera in the future, so that’s also something to think about.
Camera and Lens, or Camera and Telescope?
There are basically two different types of astrophotography setups that are common. One is a Camera and lens on a tripod or mount, and the other is a camera attached to a telescope and mount. If you use the second type of setup, the telescope is your camera lens.
Let’s take a quick look at both setups.
Camera and Lens
You’ll need to place your camera and lens on a sturdy tripod so that they won’t move. If you use a tripod, you will be limited to shorter exposures than if you use a mount because the tripod does not track the movement of the stars. The wider your lens, the longer your possible exposures and the more detailed your photos will be. Find out how to start astrophotography without tracking here.
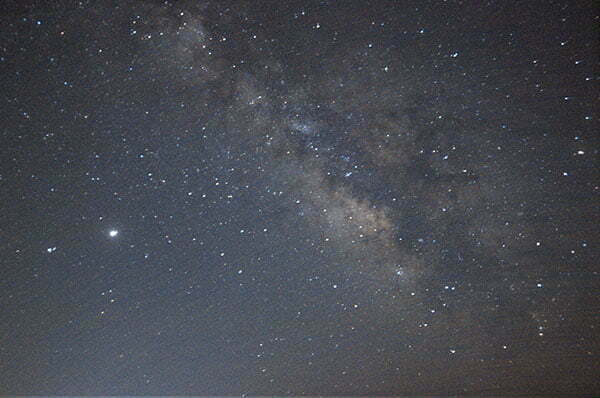
As an example, I photographed the Milky Way with a 17mm widefield lens and was able to take 20-second exposures. This gave me quite good images where the Milky Way could clearly be seen in each image I took. I did take these at a Bortle 4 location.
To use longer exposures and get better results, you would need to add a tracker mount such as the Skywatcher Star Adventurer, which is very portable and attaches to a tripod, allowing your camera to move with the stars so that you can follow and image for much longer (minutes of exposure). This will cost an additional $400 or so but will give you much better results, whether you want to photograph the Milky Way with landscape or deep sky images, which require many longer exposures.
Camera and Telescope
If you want to get closeups of the night sky and photograph deep sky objects such as galaxies, nebulae, or star clusters, then you should use a telescope in place of a lens. My telescope has a field of view of 650 mm, which is equivalent to a lens of the same focal length.
It is generally far cheaper to buy a telescope than a lens with the same focal length. A lens with a focal length of 650mm would cost hundreds or even thousands of dollars, whereas a cheap telescope could be bought for a few hundred dollars new or even less secondhand.
Here is an example of images I’ve taken with a DSLR camera and telescope early on in my journey in astrophotography:
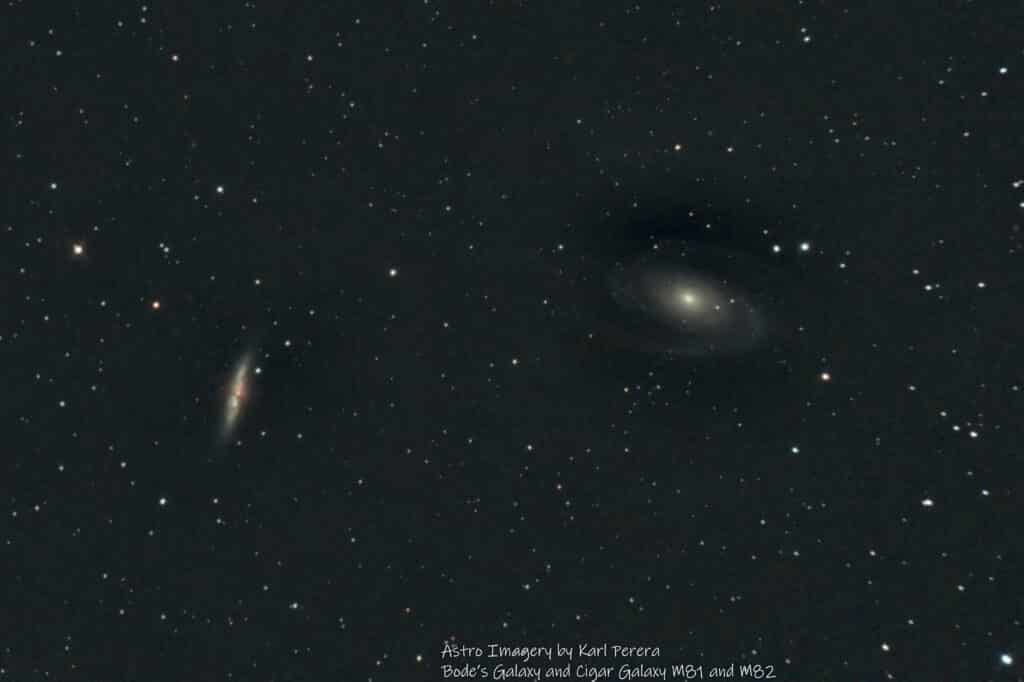
I’m still using my Celestron 130slt telescope on a replacement EQ mount, and I enjoy the results from what is quite a cheap Newtonian telescope. I had to modify it to be able to focus with my DSLR, but once that’s done, it’s easy and cheap to use a similar scope.
Be careful to look for a telescope that has a focal length between about 500 and 800 mm, depending on which deep sky targets you wish to image. The higher the focal length, the more magnification it has and the smaller the field of view. The wider the field of view, the more you will get into your frame when shooting.
Astrophotography on a tight budget: Cheap Lens
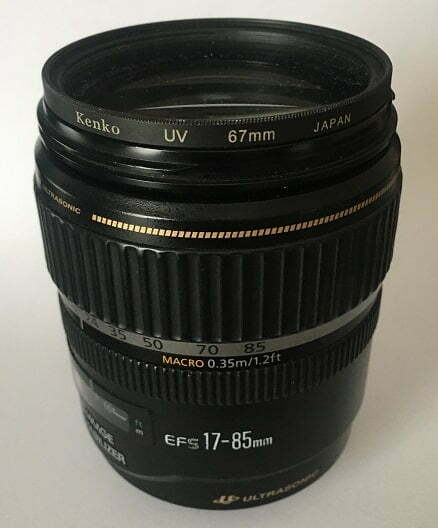
It’s not necessary to spend a lot of money on a lens for your DSLR to begin with. A number of basic lenses are sold with cameras such as the Canon I have. The lens I had was a Canon EF 17-85mm lens at F4.0. It did the job for me, as you can see from the image above of the Milky Way. Lenses like these that do not cost too much or that can be bought secondhand are suitable for beginning astrophotography.
If you want to start astrophotography on a tight budget, then there are many opportunities to buy lenses second-hand, but I’d advise you to stick with popular lenses that are produced by Canon and the other big brands. Don’t take a chance on an older lens that may not give you the results you want.
Limit your lenses to those with a focal length of 17–35 mm for the Milky Way and nighttime landscapes and 50–300 mm for other purposes. Any lens with a longer focal length is likely to be more expensive, and you’d probably do better with a cheap telescope, especially if you plan to image deep-sky objects.
Macro lenses, such as the one I have used, (see image), can offer a variety of focal lengths that can frame targets in the night sky nicely.
The good thing about a lens like this is that you can buy them second-hand quite cheaply, and often such lenses come along with the DSLR camera when you buy it. Perhaps you even have such a lens at home already?
Use a Cheap Telescope
There is quite a choice of telescopes that can be bought either new or second-hand for a budget price. Reflector telescopes are a good bet and a very good value. I bought a Celestron Newtonian with a 130mm aperture (5 inches) for about $350. You could buy a refractor as well for about the same or a little more, depending on the quality.
The main thing to think about when you are looking for a cheap telescope for astrophotography is how sturdy the tripod or mount is, and how you will connect your camera to the telescope. This connection needs to be a good fit with no movement.
Cheaper telescopes will not have such good-quality optics, but this shouldn’t be a huge problem for you if these are your first steps into the hobby. Later on in your journey, this will become more important as you seek to improve your images. Here is my guide to choosing the best telescope for astrophotography.
For astrophotography, you’ll need some kind of tracking mount if you want to image for longer than 5–10 seconds. This means you’ll need a telescope tube sitting on one of the following:
- A portable tracker such as a skywatcher star adventurer
- An alt-az go to mount (this will not only track the movement of the stars but also enable you to find deep sky objects more easily).
- An equatorial mount with GOTO, so you can track the movement of the stars and locate targets easily.
- The cheapest option is probably to buy the telescope and mount together in one package.
Here are a number of telescopes that may be suitable for astrophotography.:
| Telescope | $ Price New | Astro? | Type | FR | FL mm | Aperture | Mount |
|---|---|---|---|---|---|---|---|
| Celestron 130slt | 549 | OK | Reflector | 5 | 650 | 130 | Goto AZ-ALT |
| Sky-Watcher Skyhawk-1145P | 355 | OK | Reflector | 4.4 | 500 | 114 | Goto AZ-ALT |
| Celestron AstroMaster 130EQ | 339 | Basic | Reflector | 5 | 650 | 130 | Goto EQ |
| Celestron Inspire 100AZ | 299 | Basic | Refractor | 6.5 | 660 | 100 | Tripod |
| Sky-Watcher Startravel 120 EQ3-2 | 599 | OK | Refractor | 5 | 600 | 120 | Goto EQ |
In the table above, I have suggested a few telescopes you might look at if you want to do basic astrophotography. I think it’s best to have a GOTO system that enables you to find targets and either an ALT-AZ or EQ mount to track the stars.
I have also carried out some interesting research about which brand of telescope to choose.
If you prefer, you could buy any refractor telescope or use one that you have on a Skywatcher Star Adventurer, which is approximately $399 for the cheapest model. A suitable budget telescope for this use would be something like an SVBONY SV503 Telescope, 70mm ED Extra Low Dispersion Achromatic Refractor, which is approximately $400. I wonder if $800 counts as astrophotography on a tight budget, though. I think not.
How to make the most of Cheaper Equipment
If you are a beginner at astrophotography, it probably is not worth spending too much on equipment. You will not have acquired the skills or knowledge to use advanced equipment anyway. In the same way, cheaper equipment can produce surprisingly good results, especially if you learn how to use it.
I started with cheap equipment totalling about $500 and was happy with it for some time until I understood I needed better equipment to move to the next stage. This is much the same for any activity. Stick to a budget before you really get into the hobby and know what you are doing.
There are several things you should do to make the best use of cheaper equipment:
- keep it clean at all times
- learn about the camera settings that you need for astrophotography
- read online how others have used the lens
- do your research before buying anything to see if it will do what you want
- lower your expectations and be realistic about the results you can get.
- do not compare your results with others using better equipment
- check what is possible with the same or similar equipment – there are many examples of images online with full acquisition details provided.
- Don’t forget how important processing skills are. Keep all data and try again to see if you can improve your image when you learn how to process
- Finally, don’t be tempted to give up on your equipment and jump to much more advanced and expensive equipment before you have mastered the basics which are more important than equipment. How expensive is astrophotography, find out here.
In Conclusion
As we have seen, it is impossible to get started in astrophotography with cheap equipment. Remember that later, if you enjoy the hobby and want to get better, here are my top tips to improve your skills as an astrophotographer, you will need to upgrade your equipment and spend more. It is best to learn the basics of astrophotography using cheap equipment until you are confident in what you are doing.
I hope that you will persist and continue to overcome the challenges of astrophotography, believe me when I say it will be worth it!


