In this post, we’ll talk about how a computer can help with astrophotography, why it might be used, and why it’s not necessary. Also, whether or not you should use a computer or laptop for astrophotography depends on several things, like the equipment you have, how much automation you need, and what you are trying to do. Based on how I went from being a beginner at astrophotography to an intermediate level and what I learned along the way, I will answer this question in a way that is easy to understand and useful.
With a DSLR camera, you don’t need a laptop for astrophotography, but you do need one with a dedicated astronomy camera. This is because with a laptop you can control your camera’s cooling features, gain, exposure settings, and more plus you also need your laptop’s screen to view the photographs your camera takes.
An intervalometer can be used with a DSLR to take a set number of sub-exposures of any length, and a laptop enables you to plate-solve, plan imaging sessions, and store images.
There are many reasons why you might want to use an astrophotography laptop. It doesn’t matter if you are new to astrophotography and don’t know how to start or if you are more experienced and want to switch to using a laptop with your current setup. There are also many times when you may not want to use a computer, and that’s fine too. Let’s take a look at your options, and I hope that will help you decide if you need to use a laptop for astrophotography or not.
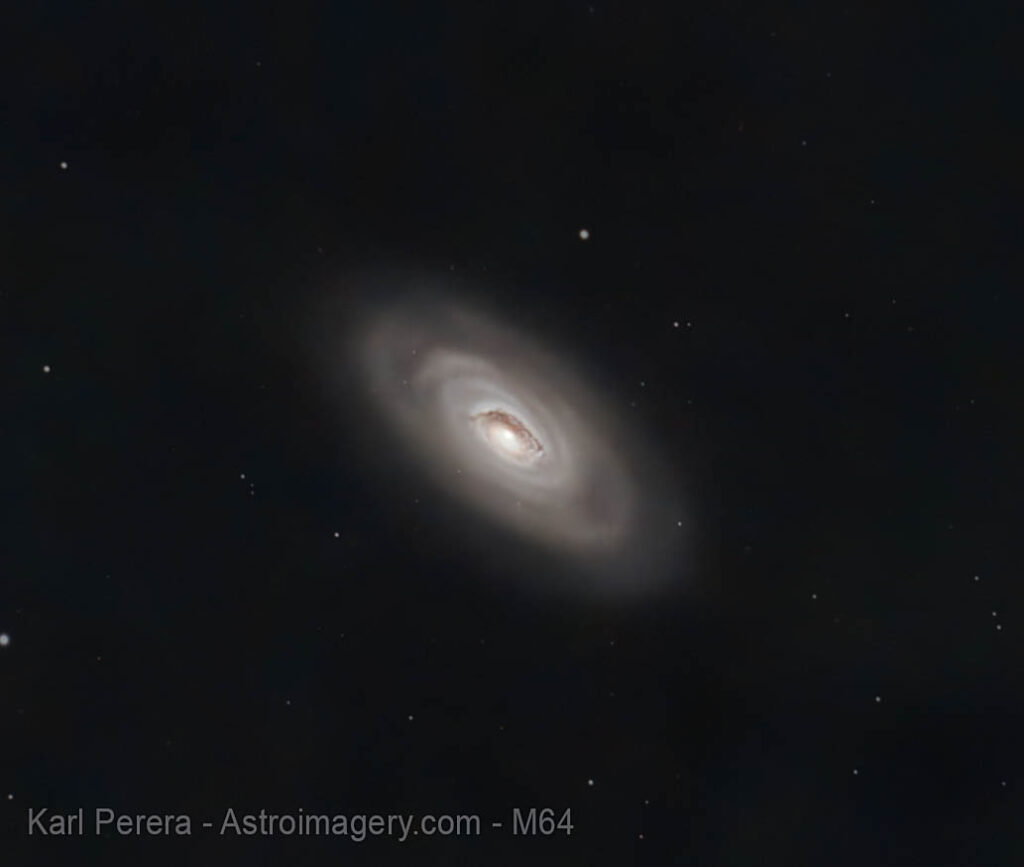
Below, you can see an image I took of the Black Eye Galaxy. I used my laptop to take photos for a total of 12.4 hours. The image was created by shooting 372 images with a 2-minute exposure. These were stacked in Siril, producing a final TIFF file. I also used a laptop to process the final stacked image in Photoshop.
Astrophotography without a computer or laptop
Astrophotography can be done without a computer or laptop, and for beginners, this is the best way to start.
So what are the alternatives to using a laptop for astrophotography?
You can start without a laptop by using a simple telescope or a DSLR camera and lens with a mount. Click here for my tips on how to do astrophotography with a telescope.
You have maybe three alternatives to a laptop:
- Use a manual mount (really only suitable for viewing with a telescope, not for astrophotography)
- Use a computerized Goto mount which has an in-built computer system and database of astrophotography targets.
- Use something like a ZWO Asair which is a kind of mini computer attached to your mount. This setup avoids the need for a laptop.
I got along just fine without a laptop for almost two years. Remember that I’m only talking about imaging here since image processing requires a computer no exceptions.
When I first started, I used a Celestron 130slt GoTo telescope which had an alt-az mount. I didn’t have to do polar alignment with this mount, and it was easy to set up my telescope by aligning on two or three stars in the eyepiece. Then I just had to type in the target on the hand controller and move it by hand until it was in the right place before I could try some test shots. It wasn’t easy, and it often took a while, to move the scope so that my target was right in the middle of my field of view.
At first, I took pictures that were exposed for 30 seconds or less and didn’t need any other gear. After a while, I wanted to increase the exposure time, so I started using an intervalometer with my DSLR set to bulb mode. Once again, no laptop was needed!
The problem was that my mount was not very accurate, so I couldn’t do much. I could manage 60 seconds at the most, which meant I had to take hundreds of images to get a good one. This also took up a lot of space on my hard drive, and I started to feel like my pictures weren’t as good as I wanted them to be.
Even when I upgraded to an equatorial mount, I manually polar aligned using the small polar telescope on my Ioptron mount and was even able to take two-minute exposures without bad star trailing. Still, I didn’t need a computer, but I had trouble lining up the stars and finding my target. This could take up to an hour until I was satisfied that the object was in the middle of my field of view.
Without a laptop for astrophotography, you can only use your equatorial mount unguided, which, depending on the quality of your mount, limits the amount of time you can expose an image. If you buy a costly mount with encoders, you might be able to do longer exposures, but this will be limited.
I found that two-minute exposures without a computer gave me good results, but I had to throw away at least 30% of the photos I took because the mount wasn’t perfect or the stars weren’t round. This small movement of the mount made the images slightly blurry.
Benefits of a Laptop for Astrophotography
At a certain point, I decided to try guiding, as I had seen such fantastic images from others and knew I had to improve the quality of my astrophotos. This meant using my laptop attached to a guide camera that was fixed to a 60-mm guide scope. This was an easy way to improve things. I used an SVbony SV301 camera as a guide camera and connected it to my laptop via USB. I then installed PHD2 guiding software on my laptop.
The addition of guiding made my pictures better, and now I can take exposures of 10, 20, or even 60 minutes if I want to, and only a small number of them need to be thrown away. This has saved a lot of time, and the quality of the images is much better.
Compare these recommended laptops for astrophotography:
| Image | Product | Features | Price |
|---|---|---|---|
 |
| Check Price | |
 |
| Check Price | |
 |
| Check Price |
Here are a few of the many reasons why a laptop for astrophotography is a good choice:
- A laptop, which is small and easy to carry, can be used.
- dedicated astronomy cameras can be used
- You can use free software like PHD2, APT, Sharpcap, Nina, and many others.
- plate-solving makes it easy and quick to find and frame objects, saving time.
- Instead of seeing pictures on the small screen of a DSLR, they can be seen on a bigger screen.
- The software on a laptop can be used to help with focusing.
- A laptop enables you to use a cooled camera which helps reduce noise in your photos.
- guiding software can be used to make longer sub-exposures of many minutes.
- Plans for imaging sessions can be run automatically on a program such as the Astrophotography Tool.
- At the right time, the software can also be used to do an automatic meridian flip and a quick re-location of your target.
Find out more about the different kinds of computer equipment you can use for astrophotography. A great video from Nico Carver.
Processing Images
There is one time when a computer must be used. When processing images, it is necessary to stretch your raw files with a program such as Gimp, Pixinsight, or Photoshop. Deep-sky objects that are very faint and distant cannot be photographed without the use of a computer stacking program. To create the final image, many images are stacked together and then processed. This is what makes astrophotography artistic.
Processing astrophotos requires practice and skill and can only be done on a computer.
My choice of software for processing images is Photoshop. Get this fantastic software here:
Conclusion
If you plan to use a DSLR camera and take shorter than 30-second exposures, you don’t need to use a computer for astrophotography. If you want to use guiding or take longer exposures, you’ll need to use a computer, either a laptop connected to your camera or an indoor PC. To take pictures with an astronomy camera, like those made by ZWO, Altair, and Rising Cam, you will also need a computer.
