Last updated
Is astrophotography easy? No. It has a steep learning curve and involves photography, experimentation, computer skills, and a creative eye. In addition, it is expensive and requires patience. It’s also helpful if you have knowledge of physics and a logical mind as there is much troubleshooting and experimentation involved in astrophotography. Progress can be quick, but astrophotography is an art that requires constant improvement.
The answer, therefore, is not as straightforward as it seems, but generally, it is not easy. To find out why and what you need to get started, keep reading.
We’ll discuss what astrophotography involves, and then you can decide if you have what it takes, and if it is something you want to commit your time to. Read on to also learn about the fascination and challenges of astrophotography.

Is Astrophotography Easy?
It could be said that astrophotography is easy to begin with, but still, there are many challenges when you start this hobby. One of the first challenges I faced was that I didn’t know much about photography or how to use a DSLR camera. I had to learn about the best camera settings like ISO, F-number, and shutter exposure time. If you know about photography this is a good start but focusing and taking exposures in the dark presents many problems for the beginner astrophotographer.
How easy is it to learn photography?
According to Noble Desktop, a company providing professional learning and career development based in New York, learning photography as a beginner is very challenging and involves mastering many skills and understanding the behind it.
The easiest way to start astrophotography is to use just a DSLR with a tripod and no tracking. You can then progress to using a star tracker or telescope mount to make longer exposures possible. You can also use different cameras including smartphones, DSLRs and astro cameras. Each camera can take pictures of different objects in the night sky and requires different setups and skills to use properly. The challenge comes to learning how to get the best out of your equipment and how to set it up so you get the best images.
There is a steep learning curve to learning photography and then mastering the specific conditions that make astrophotography difficult. There will be many problems for you to overcome on your way to capturing those planets, galaxies, nebulae, comets and so on.
In my experience, I learned the basics of night time photography quite quickly, and was soon ready for my first attempts at astrophotography. Here is one of the first astrophotography images I took:

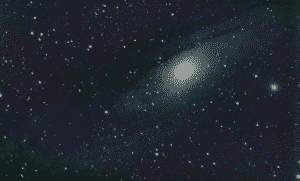
The above image was taken at the start of my journey as an astrophotographer. It doesn’t show much detail, but at the time, I was amazed because I saw a galaxy for the first time and was blown away that it was possible to photograph it. It was taken in my backyard using my Celestron 130-slt az-alt telescope.
After about six months of experience, I was able to improve in leaps and bounds. Here is another later picture, which is much improved:

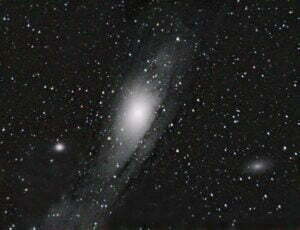
I plan to soon revisit Andromeda and take an up-to-date shot now that I have been doing astrophotography for several years. I have learned so much in that time about filters, exposure and integration time, stacking, and much more. I’m also lucky enough to live in a place where there are lots of clear skies!
Astrophotography becomes easier with experience. I really struggled for the first year. It takes time to learn how to do anything worthwhile and astrophotography is no different.
Learning Astrophotography
For a beginner, there is a lot to learn. I recommend reading as much as you can and watching as many YouTube videos as you can to see if this hobby is for you. I’ve found forums to be especially helpful. One forum I recommend is Cloudy Nights, where you can find interesting discussions on all things astronomy, including astrophotography and imaging. There are a tonne of great videos on Youtube, and I like those by Trevor Jones1, Nico Carver2, and Alyn Wallace3 in particular.
What do you need to learn? Some things include how to find, image, and process objects in space. You need to learn about the best equipment to use for the level you are at. You need to learn about what is up there in the sky. Are you interested in imaging the Milky Way, planets, galaxies, star clusters, or deep-sky objects like nebulae? What you want to image will determine the techniques and equipment you need to use.
Understanding the Learning Curve: Astrophotography by Type
Astrophotography difficulty changes according to what you’re shooting. Here’s how the learning curve, gear, and common pitfalls differ across Nightscapes, Planetary, and Deep‑Sky.
Quick overview
| Type | Typical Subjects | Overall Difficulty | Why Difficult |
|---|---|---|---|
| Nightscapes | Milky Way over landscapes, constellations, Moon-lit scenes | Low → Medium | Shorter exposures, simpler gear; composition matters; light pollution and focus at infinity can still trip you up. |
| Planetary | Jupiter, Saturn, Mars, Lunar detail | Medium → High | High magnification, seeing‑limited results, video capture + stacking, collimation/focus sensitivity. |
| Deep‑Sky | Nebulae, galaxies, clusters | High | Long tracked exposures, precise polar alignment, guiding, calibration frames, advanced processing. |
What makes each type of astrophotography hard?
Nightscapes (Wide-field/Night sky landscapes):
- Best for: Beginners wanting fast wins and beautiful compositions.
- Skills to learn: Manual exposure, focusing at infinity, foreground planning, light pollution management.
- Common challenges: Star trailing without a tracker; noise at high ISO; gradients from light pollution.
- Upgrade path: Add a star tracker to extend exposure time and reduce ISO.
Planetary
- Best for: Those who enjoy detailed work and tinkering with capture/stacking software.
- Core skills: High‑frame‑rate video capture, collimation, precise focus, stacking (AutoStakkert!, RegiStax, WinJUPOS).
- Common challenges: Atmospheric seeing limits; tiny apparent size; critical focus.
- Upgrade path: Add a barlow, ADC (atmospheric dispersion corrector), mono + filters for advanced results, larger telescope.
Deep‑Sky
- Best for: Patient learners aiming for nebulae/galaxies with long integrations.
- Core skills: Polar alignment, autoguiding, calibration frames (darks/flats/bias), plate solving, gradient reduction and color calibration in processing.
- Common challenges: Tracking accuracy; cable management; large data sets; complex post‑processing.
- Upgrade path: Better mount first, then optics/camera; consider narrowband filters under light pollution.
Difficulty of Each Type of Astrophotography Compared
| Factor | Nightscapes | Planetary | Deep‑Sky |
|---|---|---|---|
| Setup complexity | Low | Medium | High |
| Mount requirement | Tripod; tracker optional | Tracking helpful but alt‑az can work for short captures | Equatorial mount strongly recommended |
| Exposure/Acquisition | Single frames or short stacks | High‑fps video (SER/AVI), thousands of frames | Many long subs over multiple nights |
| Processing complexity | Low → Medium | Medium (stacking + sharpening/derotation) | High (stacking, calibration, gradient removal, noise reduction, color) |
| Sensitivity to seeing | Low | Very High | Medium |
| Sensitivity to light pollution | Medium | Low | High (mitigated with filters) |
| Cost floor (typical) | Low ($300–$800 if you own a camera) | Medium ($800–$2k+) | High ($1.5k–$4k+ entry tracked rigs) |
| Time to first good result | Same night | Days (learning capture/stacking) | Weeks (capture + processing) |
Suggested starting points and baseline settings
| Type | Minimal Gear | Baseline Settings | Starter Targets |
|---|---|---|---|
| Nightscapes | DSLR/Mirrorless + fast wide lens + tripod | Manual, RAW, 15–25s, f/1.4–f/2.8, ISO 1600–6400; “500 rule” for shutter | Milky Way core, nebulae with landscape, constellations; moonlit foregrounds |
| Nightscapes (with tracker) | Add star tracker | 60–180s, f/2.8–f/4, ISO 400–1600; stack 10–50 subs | Wide Milky Way mosaics; Andromeda at 85–135mm |
| Planetary | Modest SCT/Newt + barlow + color planetary camera | High‑fps video, short exposures to freeze seeing; gain moderate; capture 2–5 min per planet; stack best 10–20% | Jupiter/Saturn etc. ; lunar craters, the moon phases |
| Deep‑Sky (entry) | Small refractor (250–500mm) + EQ mount + DSLR/OSC | 60–180s subs; ISO 400–1600 (DSLR) or low gain (OSC); total 2–6h; dither every 1–3 frames; calibrate with darks/flats | Orion Nebula, Pleiades, North America Nebula, Andromeda |
Tip: For deep‑sky, the mount is the most important piece of equipment and polar alignment needs to be mastered. As Sky & Telescope notes, deep‑sky imaging requires guiding—a skill “in no other kind of photography”—which is a major contributor to its higher difficulty (Sky & Telescope). And Popular Science’s classic line captures the vibe succinctly: “Astrophotography is hard. Astronomically hard.” (Popular Science). AstroBackyard reiterates this for beginners, setting expectations realistically (AstroBackyard). For a deeper appreciation of pitfalls like turbulence and noise that make this challenging, see Thierry Legault’s guidance via Universe Today (Universe Today).

✅ Quick Takeaways for Beginners
Nightscape (Wide‑Field Milky Way)
- Use the 500 Rule as a starting guide:
500 / focal length = max exposure (seconds)- Example: 24 mm lens → ~20 s exposure.
- The NPF Rule (more precise, accounts for sensor size & pixel pitch) is often ~30–40% shorter than the 500 Rule → faster shutter, sharper stars.
- Typical settings: 15–25 s • f/2–f/2.8 • ISO 1600–6400 depending on lens speed & light pollution level.
- Easier to start: all you need is a DSLR/mirrorless + tripod.
Planetary
- Aperture matters more than focal length → the larger the telescope, the sharper the data.
- Planets are bright → typical exposures 1–10 ms (yes, milliseconds).
- Always shoot high‑frame‑rate videos (60–200 FPS) and stack thousands of frames for best results.
- Software: AutoStakkert!, RegiStax, or similar.
Deep Sky (nebulae, galaxies, clusters)
- Long exposures are essential → 30 s to 5 min per sub‑frame, 1–5+ hours total.
- Requires equatorial mount or tracker → unguided = star trails even at short subs.
- Focus on total integration time.
- Narrowband filters (H‑alpha, OIII, SII) = game changers for city skies.
⚡ Rules of Thumb
- 500 Rule vs NPF Rule: Use 500 rule for simplicity, NPF for precision (free calculators available online).
- ISO Myth: Higher ISO doesn’t “capture more light,” it just boosts the signal → prioritize aperture, exposure time, and total integration.
- Integration Time > Single Exposure Length: 100 × 30 s subs almost always beat 1 × 3000 s exposure.
Before you get into this hobby, make sure you are aware of what it involves. This is what I am trying to lay out for you here on this page. So what is involved, and what challenges will you face?
Here are a few of the challenges involved and things you will need to learn:
- How to focus when you can’t see very much in your camera
- How to find your object and frame it
- How to stack your images
- How to process your images in a program such as Photoshop
- What different kinds of helpful software can you use for astrophotography?
- Choosing a good telescope, camera, and filters
- Cleaning your telescope mirror when necessary
- Understanding how many sub-exposures and what length is best for your target
- What to do about light pollution and its effects
- How to use auto-guiding for longer and better exposures
- How to research before you get any new equipment
Learning astrophotography requires patience and persistence. This hobby is very much trial and error and involves a lot of problem-solving along the way. It can be frustrating and difficult, but at other times, when it goes smoothly, it seems easy and enjoyable.
So prepare yourself for a steep and long learning curve, as this is a hobby that can probably never be totally mastered.
How to Make Astrophotography Easier
Perhaps the question shouldn’t be, “Is astrophotography easy?” Maybe we should be asking, “how can we make astrophotography easier?”
There will also be challenges to your progress in astrophotography. I know how much I have struggled in my first couple of years doing this. However, there are simple steps you can follow to make astrophotography easier. Here are some of my suggestions:
- Read a forum like Cloudy Nights to learn as much as you can and benefit from others’ experiences or advice. Ask questions, and you’ll get helpful answers.
- Watch the many Youtube videos that can help you with all aspects of astrophotography, from buying and choosing equipment to processing images and how to use the various software options out there.
- Keep imaging as often as you can and focus, especially in the early stages, on improving an aspect of the process such as focusing, polar alignment, etc.
- Don’t be scared to try new things out and experiment to see what works best with your equipment and in your situation.
- Make sure you research well before buying new equipment. It is easy to buy something that either you are not ready for or that will require other equipment to incorporate into your setup.
- Don’t get carried away with buying filters; sometimes there are better things to spend your money on that will bring you better results quicker.
- Always take your time to set up your equipment correctly. Balancing your rig, polar aligning accurately, and focusing well are essential steps, and we all need to take time to get these basic steps done right before starting.
- Check and recheck sometimes a few times during a night of imaging. I don’t know how many hours and how many photos I have lost due to skipping something.
I hope this page has been helpful. You can always contact me for help or to ask a question. I will be happy to answer.
Frequently Asked Questions (FAQ)
Q1: Is astrophotography difficult for a complete beginner?
A1: While astrophotography has a steeper learning curve than many other forms of photography, it’s more accurately described as challenging and rewarding rather than “difficult”. Capturing wide-field nightscapes, can be relatively easy with basic gear. Photographing deep-sky objects is more difficult , and requires specialized equipment, more advanced techniques, and a lot of post‑processing.
Q2: What’s the easiest type of astrophotography to start with?
A2: Nightscape photography (capturing wide-angle views of the Milky Way, constellations, or star trails with foreground landscapes) is the easiest to do. It requires more basic equipment—a DSLR or mirrorless camera, a wide-angle lens, and a sturdy tripod—and the processing is easier compared to planetary or deep-sky imaging.
Q3: Do I need expensive equipment to get started in astrophotography?
A3: Not necessarily. You can begin with equipment you might already own, such as a modern DSLR or mirrorless camera, a fast wide-angle lens (f/2.8 or faster), and a sturdy tripod. This setup is perfect for nightscapes. As you progress to planetary or deep-sky imaging, you’ll need to invest in quality telescopes, mounts, and dedicated cameras, but you can achieve impressive results even on a moderate budget.
Q4: How long does it take to learn astrophotography at different levels?
A4: The timeline varies:
- Beginner (Nightscapes): 1–3 nights to learn the basics of camera settings, composition, and exposure; 2–4 weeks of practice capturing the Milky Way.
- Intermediate (Planetary): 2–6 months to get comfortable using a telescope, focusing at high magnification, stacking thousands of images, and learning planetary processing software.
- Advanced (Deep Sky): 1–3 years of hands‑on practice to fully master polar alignment, guiding, multi‑night integrations, calibration frames, and advanced image processing. Results improve steadily, but the “mastery” curve here is much steeper.

Q5: How much time does astrophotography typically take, from shooting to editing?
A5: This varies greatly by the type of astrophotography. A simple nightscape might take an hour of shooting and another hour or two for basic editing. Planetary imaging involves short video captures (minutes) but can take several hours to process thousands of frames. Deep-sky astrophotography is the most time‑intensive, often requiring multiple hours of exposure time over several nights, followed by many hours (or even days) of meticulous calibration and processing.
Q6: Can I do astrophotography if I live in a city with light pollution?
A6: Yes, absolutely! While dark skies are ideal, you can still do astrophotography from light‑polluted areas. For nightscapes, you might need to travel to darker locations, but planetary imaging is unaffected by light pollution. For deep‑sky objects, specialized narrowband filters can effectively block out city glow, allowing you to capture stunning nebulae and galaxies even from urban environments.
References
[1] Astrobackyard. YouTube. Retrieved from https://www.youtube.com/channel/UCmCJNTnfr59HHbkZyBpu2qg
[2] Nebula Photos – YouTube. Retrieved from https://www.youtube.com/channel/UCO_gBdHekc74feh0bWqKJ1Q
[3] Alyn Wallace – YouTube. Retrieved from https://www.youtube.com/c/AlynWallace/videos


